Adobe Illustrator Smart Notes

Color

Overview

Color Terms

Understanding Illustrator's color facilities requires familiarity with the following terms.

Term Definition Comment
Spectral Color A wav length of electromagnetic radiation that falls within the visible spectrum. The term spectral color contrasts with the term perceptual color, or simply color.
Color A perception of color that can arise from sensory stimulation by a single spectral color or by a mixture of primary spectral colors. The unmodified term color refers to perceptual color as represented on the color wheel. Since the spectral colors fall in a linear range, but perceptual colors that are produced by mixing primary colors form a color wheel, some perceptual colors do not correspond to any single spectral color.
Primary Color One of a small number of colors that can be mixed together to produce the same impression as any of a wide range (gamut) of colors.  
Color Model One of the general methods used in digital graphics to represent colors in terms of numbers that may correspond to a small number of primary colors or a small number of dimensions. Note that the human eye works by comparing the output of 3 types of receptors that have their peak output very approximately at three primary colors. Illustrator supports three color models RGB, CMYK, and HSB.
Color Space A subset of all the colors, which may depend on the medium, the output device, and the manufacture. Examples Adobe RGB, Apple RGB, and sRGB.
Color Gamut A range of colors in a Color Space.  
RGB A color model that represents all colors by mixing together the three primary colors: Red, Green, and Blue light. This model is called an additive model, because each color is produced by adding together red, green, and blue lights. Any combination of these three lights that stimulates all three human color receptors equally will produce gray. Used in light generating devices such as TVs and monitors.
CMYK A color model that represents all colors by mixing together the three primary colors: Cyan (C), magenta (M), and yellow (Y), plus black (K). The "K" stands for the key color. These four colors are called process colors. This model is called a subtractive model, because each color is produced by mixing together cyan, magenta, and yellow, and black pigments, that absorbed (subtract) light that is reflected to the eye. Printing that uses some mixture of cyan, magenta, and yellow, and black ink is called four-color process printing. A color specified as a mixture of these colors is called a process color, as opposed to a spot color. Because it depends on reflected light, CMYK has a smaller color gamut than does RGB.
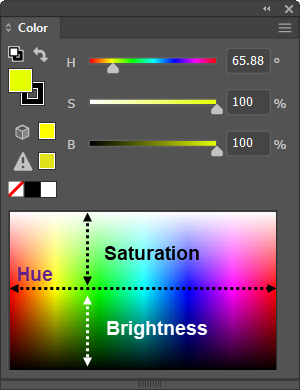
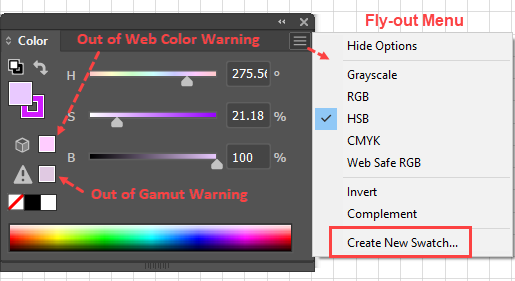
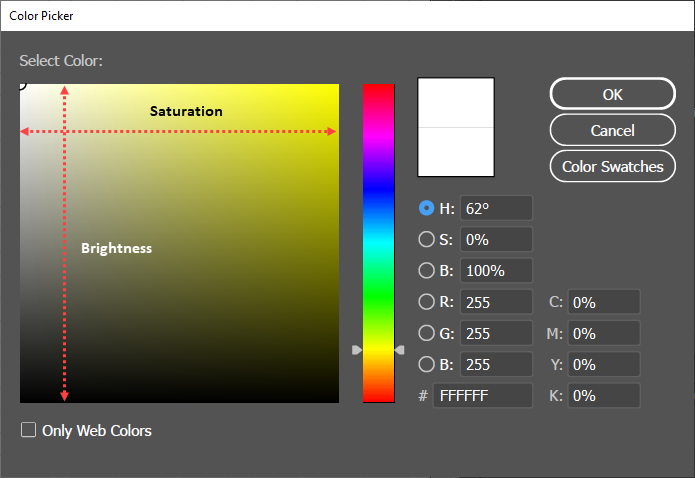
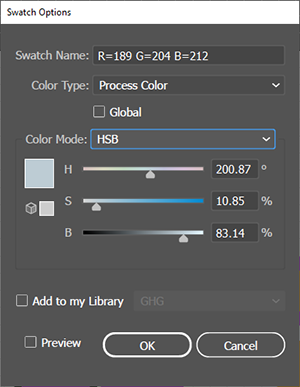
HSB A color model that represents subjective colors in terms of three numerical dimensions: Hue, Saturation, and Brightness. Hue is a number between 0 and 360 that represents an angle on a standard color wheel. Saturation is a percentage value between 0% (no color, i.e., gray) and 100% (i.e., pure color, fully saturated). Brightness (i.e., the luminosity, or gray scale value) is a value between 0% and 100%; where 0% corresponds to black, and 100% corresponds to white. For output devices, a HSB color must be simulated by some RGB or CMYK color.
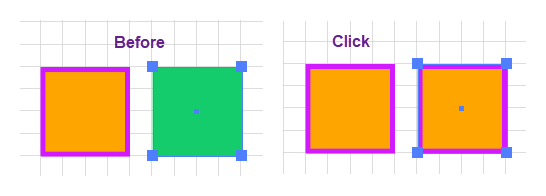
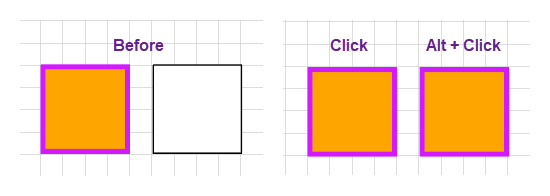
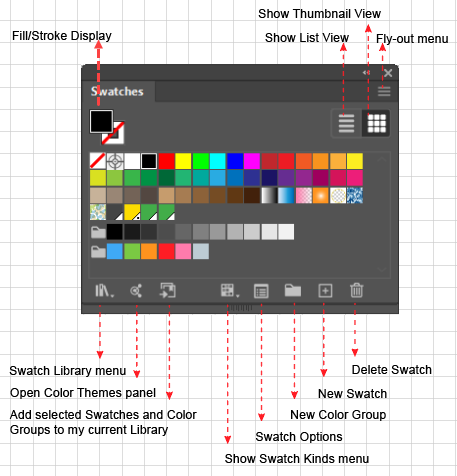
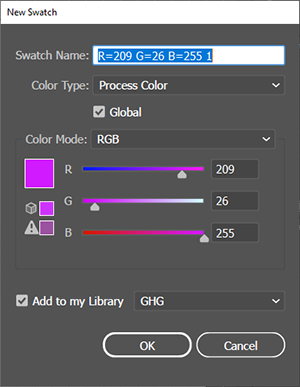
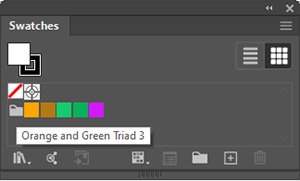
Global Swatch An Adobe Illustrator term that refers to a feature that allows you to designate a swatch's color mix as Global. A Global swatch remains associated with all instances where you have used the Global swatch, and when you update a Global swatch, all the places where you have used instances of the Global color swatch will automatically update. In the Swatches Panel, Illustrator flags a swatch as Global by placing a small white triangle in the lower right corner of the swatch icon. In illustrator, a Global Color is a software object known as a class or type. The software class allows you to treat a fill or stroke where you used that color, not as an isolated object property, but as one of a class of properties that were made using that swatch. Global colors are useful, for example for maintaining a corporate color palette.
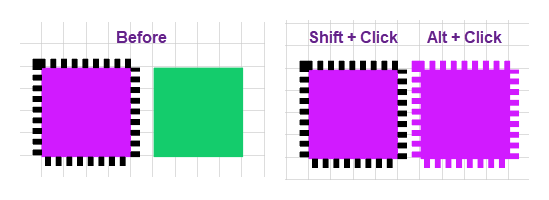
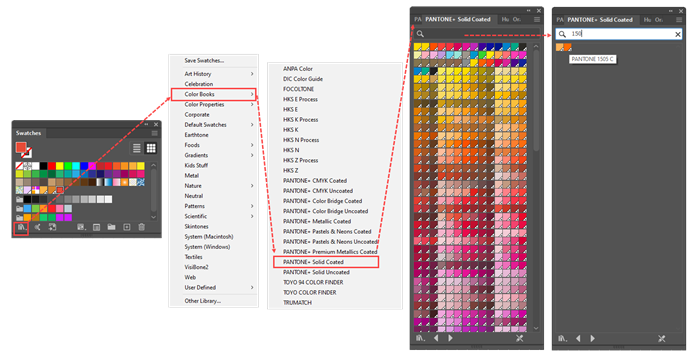
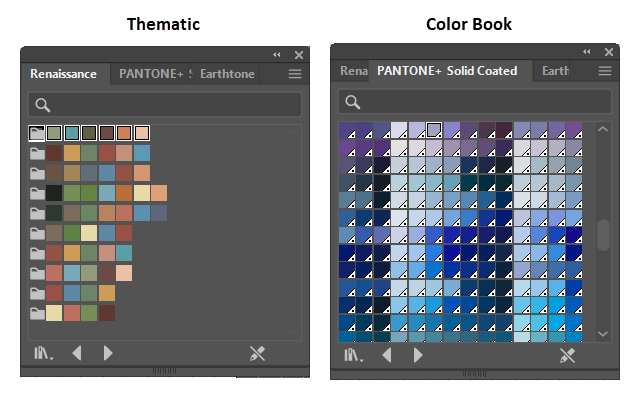
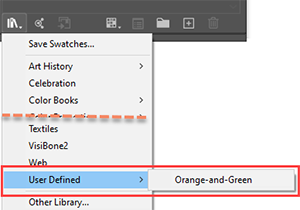
Spot Color A term used in the printing industry to describe a color that is mixed on the press and often specified in an industry standard formula guide library. These libraries (e.g., PANTONE Solid Coated) specify appropriate ink formulas for particular types of paper. To find these in the Swatches panel, you click the Swatch Libraries menu icon and then on the popup menu select Color Books. Illustrator represents a spot color swatch with the same (small white triangle in the lower right corner) as it does for a Global color, but it puts a dot in the triangle. Contrasts with Process Color. The color that appears on your computer monitor is an RGB simulation of an industry standard color. The final printed color will depend on the printers choice of paper, ink mixing process, and varnish. Spot colors are used, for example, to print a company logo that is specified by brand marketing guidelines.
Process Color A term used in the printing industry to describe a printing process that uses the four CMYK colors. Used for printing jobs (such as photographs) that require many different mixtures of inks to represent many subjective colors. A process color application contrasts with, for example, a 3 (spot) color printing job, which might be all that is needed to accurately print the corporate logo, and another highlight color.
Illustration showing that the Current Color is always the targeted row in the Appearance panel.
Current Color

Current Color

The Current Color is the color that Illustrator is working on at the moment.

The Current Color is set as follows. If an object is selected (as shown by a selection square in the Layers panel), then the Current Color is the fill or stroke that is targeted in the Appearance panel. The settings of all the fills and strokes shown in the Appearance panel and the Current color are sticky, i.e., they will remain in place until they are changed. If you create a new object, it will have all the fills and strokes that are set in the Appearance panel. Whenever you change the Current Color in any of the following ways, Ai will synchronize the other color controls to reflect the change::

  • Fill/Stroke display in the Tool panel,
  • Fill/Stroke icon in the Color panel,
  • Fill/Stroke icon in the Color Picker,
  • Fill and Stroke icons in the Control panel,
  • Fill and Stroke icons in the Properties panel,
  • Fill/Stroke icon in the Swatches panel, and of course the
  • Selected row and highlighted fill or stroke icon in the Appearance panel.
Illustration of Current Color with No Selection
Current Color with No Selection

Of course, if you use one of the above color controls to update the Current Color, Ai will also update all the others. However, only the Appearance panel will always show all of a selected object's fills and strokes and will allow you to target and change any one of them.

Recall that an object can have several fills and several strokes) and note that while the Fill/Stroke display in the Tool panel is the most prominent place that Illustrator shows the Current Color, the Fill/Stroke display can only show one fill and one stroke. To get the whole picture it is best to work in the Appearance panel, as will all of the examples that are presented here.

Fill/Stroke Display

Even though it does not provide a view of all fills and strokes, the Fill/Stroke Display does allow you to do the following:

Illustration of how Illustrator Shows and Sets the Current Color in the Fill/Stroke Widget in the Tools Panel
How Illustrator Shows and Sets the Current Color in the Fill/Stroke Widget in the Tools Panel
  • Return the Fill/Stroke to the default by clicking the black and white squares icon or d-key.
  • Switch the focus of the Fill/Stroke (and therefore the Current Color) by clicking the double arrow icon, or the x-key.
  • Launch the Color Picker by double-clicking on the Fill/Stroke display.

If no object is selected, then the Appearance panel's heading will read "No Selection," but the panel's fill and stroke icons will always display the fills and strokes that were set last. If no objects or fills and strokes were ever selected, Ai will display the default white fill and black stroke. However, you can still set any number of fills and strokes in the Appearance panel and Ai will apply them to the next object that you create.

Using Illustrator Color Facilities

Change a Fill or Stroke Color

To apply a fill or stroke color to an object in Adobe Illustrator

  1. Select the object on the Artboard or in the Layers panel.
  2. Go to the Appearance panel and double-click the thumbnail icon that represents the fill or stroke that you want to target. Ai will open a compact version of the Swatches panel.
  3. In the compact Swatches panel, simply click a swatch of the color to which you want to change the selected fill or stroke.
  4. Alternatively, instead of steps 2 and 3, go to the Appearance panel and click on a gray part of the row for the fill or stroke that you want to change. Ai will target it and make its color the Current Color. Then, use the Color panel, Color Picker, or the Color Guide panel to change the color.

Using the Eyedropper Tool to Replicate Appearance Attributes

Illustration of how to set what attributes the Eyedropper should copy and what attributes it should paste.
Eyedropper Options for What to Copy and What to Paste

The eyedropper tool (shortcut: i-key) can replicate attributes, i.e., copy attributes from a source object, and paste them over the corresponding attributes in a destination object. Although often used to replicate colors, the Eyedropper can copy and paste all of the fill and stroke attributes, and even font attributes such as font type, style, and weight. You can specify which attributes you want to copy and paste via the Eyedropper Tool Options dialog.

Ai provides two methods for working with the eyedropper tool:

  • With both the source and destination objects unselected, or
  • With the destination object selected and the source object unselected.

When working with both source and destination unselected, clicking with the Eyedropper on a source object copies its attributes, and Alt + clicking on a destination, object pastes the copied attributes, and replaces those of the destination object. When copying the eyedropper cursor is oriented from bottom left to top right. When it is pasting the cursor is oriented from bottom right to top left.

When you already have a destination object selected (e.g., when you have just created the object), it is easier to use the second method. Then you can simply click with the Eyedropper on the source object. The eyedropper tool, Ai will pick up the attributes from the source) object and apply them to the previously selected (destination) object.

Set Eyedropper Tool Options

To restrict the attributes that the Eyedropper can copy or paste in Adobe Illustrator:

  1. Double-click the eyedropper tool to display its Options dialog.
  2. Check the checkboxes in the Eyedropper Picks Up column to tell the Eyedropper which attributes to copy.
  3. Check the checkboxes in the Eyedropper Applies column to tell the Eyedropper which attributes to paste.
Illustration of how to use the The Select the Destination and Click the Source Method of Copying Attributes
The Select the Destination and Click the Source Method of Copying Attributes

Replicate Attributes from a Source Object to a Selected Object

To paste attributes to a selected destination object from a source object with the eyedropper tool in Adobe Illustrator:

  1. Select the destination object first.
  2. Click with the Eyedropper tool (shortcut: i-key) on the source object. Ai will paste all the attributes enabled in the Options dialog from the source to the destination object.
Illustration of how to use the Eyedropper's <strong>Click the Source</strong> and <strong>Alt + Click> the Destination</strong> Method of Transfering Attributes
The Click the Source and Alt + Click > the Destination Method of Transferring Attributes

Replicate Attributes without Selecting

To copy attributes from an unselected source object to an unselected destination object in Adobe Illustrator:

  1. Click with the Eyedropper tool (shortcut: i-key) on the source object.
  2. Alt + click with the Eyedropper tool (shortcut: i-key) on the destination object. Ai will paste all the attributes enabled in the Options dialog from the source to the destination object.

Note that as soon as you click on the source object, Ai will "load the eyedropper," i.e., will make a copy of the source object's attributes. However, the loaded cursor stays in its original bottom left to top right orientation. When you hover over the destination object, as soon as you depress the Alt-key, Ai will switch the eyedropper to the bottom right to top left orientation.

Illustration of how to copy a single color with the Shift + Click method.
Copy a single Color

Replicate a Single Color with the Eyedropper Tool

To copy just one color (selected with the Eyedropper) from an unselected source object and apply that color plus all of the source object's other (non-color attributes) to the destination object in Adobe Illustrator:

  1. Shift + click on the source object. For example, suppose that you click on the source object's pink fill color. Ai will pick up only the fill color but will pick up the other source attributes, including the stroke's dash, and width settings.
  2. Alt + Click on the destination object. Ai will apply the copied attributes to the destination object. For example, as shown in the accompanying figure if the source object had a wide, black, dashed stroke, the destination object will have a wide, dashed, pink stroke.

Creating a Custom Color

RGB and CMYK make sense to display and printing equipment, but not to humans. Fortunately, Illustrator supports the HSB model which was designed to approximate the dimensions of human color perception, i.e., hue, saturation, and brightness. Therefore, when creating a custom color, it is best to create the color in HSB and then switch back to RGB or CMYK to get the numerical values that you need for the Web or for Print.

Illustrator provides 3 primary means of creating colors, and a special, stand-alone facility for creating a custom color for a new swatch. The primary color facilities for creating a custom color are the Color panel, the Color Picker, and the Color Guide panel.

Illustration of the Color Panel's Spectrum is Intuitive in the HSB Color Model
The Color Panel's Spectrum is Intuitive in the HSB Color Model

Using the Color Panel

Create a Custom Color

To create a color with the Color panel using the HSB color model and add it to the Swatch panel in Adobe Illustrator:

  1. With no object selected, open the Color panel (Windows > Color) and if you do not see the color sliders, open the panel's fly-out menu, and click Show Options. Ai will show the Color panel with sliders that show the last targeted Current Color, displayed in terms of the numbers that represent the color in the document's color model.
  2. Click on the panel's fly-out menu and choose HSB.
  3. On the color spectrum Select an approximate Hue, Saturation, and Brightness, and then make fine visual adjustments with the sliders.
    Illustration of how to create a swatch with the Color panel
    Color Panel Fly-out Menu, Warning Indicators, and Create New Swatches Option
  4. Check the Out of Gamut Warning indicator, and optionally, the Out of Web Color Warning indicator (see the accompanying figure). You can simply click them to choose the closest correct value.
  5. Open the fly-out menu and click Create New Swatch. Ai will open the New Swatch Panel.
  6. In the New Swatch panel, name the swatch and set its other parameters. Ai will create the swatch and add it to the document's Swatch panel.
Modify a Fill or Stroke Color

To modify a fill or stroke color with the Color panel in Adobe Illustrator:

  1. Select the object and target the fill or stroke in the Appearance panel
  2. Open the Color panel (Windows > Color). If you do not see the panel's color sliders, click the Color panel's flyout menu and click Show Options. Ai will show the Current Color described in terms of the numbers that represent the color in the document's color model along with sliders that allow you to dynamically change the color numbers.
  3. Adjust the colors with the sliders or by typing the color numbers directly into the number fields, which the panel displays at the right of each slider. Ai will change the color and its representation in the Appearance panel and in the Tools panel's Fill/Stroke indicator.
Illustration of How the Color Picker Specifies 3 Color Dimensions
Color Picker Specifies 3 Color Dimensions

Color Picker

The Color Picker interface allows you to visually specify color numbers along 3 dimensions. Therefore, you can use it to specify colors only in the HSB or RGB model, but not in the CMYK model which uses 4 color dimensions. The interface has a slider and a square spectrum display. To specify a color, you click one of the 3 HSB or the 3 RGB radio buttons. That makes the selected dimension, the one that AI allows you to specify with the slider. When you have specified the value for one dimension with the slider, the square spectrum represents all the possible combinations of the other two dimensions. You specify the values for the two-remaining dimension by simply clicking a point on the spectrum. Then, the numerical fields show the corresponding color numbers for HSB, RGB, and CMYK.

As described below, the HSB color model is particularly useful for specifying a new color, because its dimensions are designed to correspond to the dimensions of human color vision.

To create a color with the Color Picker in Adobe Illustrator:

  1. Double click the in focus color in the Fill/Stroke Display in the Tools panel. Ai will launch the color picker, showing the Color Models view by default. Clicking the Color Swatches button will show a list of the swatches in the Swatches panel.
  2. Select the Hue radio button. Ai will display the hue dimension on the slider, and in the color spectrum square, will display the available combinations of Saturation (along the horizontal dimension) and Brightness (along the vertical dimension).
  3. Click + drag over the Spectrum. As you drag, Ai will update the numerical values in the Brightness and Saturation fields and will also update the hexadecimal field (#) at the bottom of the panel. Alternatively, you can type numerical values directly in the decimal fields or in the hexadecimal field.
  4. Click the OK button. Ai will update the Current Color.
Illustration of How to Pick Color Harmony Rules
Pick a Color Harmony Rule

Color Guide Panel

The Window > Color Guide panel suggests groups of harmonious colors that are based on geometrically defined positions on the traditional Color Wheel. For example, opposite positions define complementary colors, and triangular positions on the Color Wheel define triads. To see the color wheel representation of the Color Harmony Rule, click the Color Guide flyout menu and click Edit colors.

To find harmonious colors in Adobe Illustrator:

  1. Set the Current Color (e.g., target a fill or stroke in the Appearance panel, or pick a color in the Swatches Panel). Ai will load that color into the Color Guide.
  2. Go to the Window > Color Guide panel (Shift + F3).
  3. Optionally, using the icon in the lower left corner, limit the suggested colors to those in one of Ai swatch libraries.
  4. Illustration of How to Edit a Color Rule with the Color Wheel
    Edit a Color Rule with the Color Wheel
    Pick a Color Harmony Rule from the dropdown.
  5. Optionally, edit the rule visually by opening the flyout menu and selecting Edit Colors. Ai will display the Edit Colors dialog box which shows a Color Wheel version of the Color Harmony Rule where you can select colors as positions on the wheel. When you have finished specifying the rule, Ai will:
    1. Generate harmonious colors and display them in the top row.
    2. Generate a matrix that, by default, displays shades and tints of each color in the top row.  The colors in the middle row of the matrix are the same as those in the top row. Instead of accepting the default Shades/Tints variants display in the matrix, you can go to the flyout menu and choose to display a matrix of Warm/Cool or Vivid/Muted variants. Optionally, adjust the number of columns of shades and tints and the degree of contrast in the display (Flyout Menu > Color Guide Options)
      Illustration of How to Change the Color Guide Matrix
      Change the Color Guide Matrix
  6. To use colors from the matrix in artwork:
    1. Select the colors in the matrix (e.g., click the top cell in the center column and shift + click the bottom cell in the center column to select the basic colors of the harmony rule).
    2. Export the selected color cells. Go to the fly out menu and choose Save Colors as Swatches. Ai will put the selected colors into a color group and add it to the Swatches panel.

Swatches

Illustration of the Swatch Panel Controls
Swatch Panel Controls

Swatches are named colors that are stored with each document. Ai shows the document's swatches in the Swatches panel (Windows > Swatches). Swatches can include tints gradients and patterns, and by default the panel provides starter swatches of each sort. However, this section focuses on color swatches for process colors, and spot colors.
The Swatches panel provides facilities for the following key functions:

  1. Organize swatches into Color Groups.
  2. Create Global Swatches that allow you to (A) designate a color swatch as defining and representing a type of color, (B) create many instances where that type of color is applied to a fill or stroke, and (C) change all instances where that color was used by updating the defining (global) swatch.
  3. Use libraries of swatches, which are stored separately from the document (in Program Files\Adobe\Adobe Illustrator 2020\Presets\en_US\Swatches), but which can be imported into the document's Swatches panel.

Apply a Swatch Color

To apply a color from the Swatches panel to an object's a fill or stroke in Adobe Illustrator:

  1. Select the object on the Artboard or in the Layers panel.
  2. Go to the Appearance panel and click the thumbnail icon that represents the fill or stroke that you want to target. Ai will open a compact version of the Swatches panel.
  3. In the compact Swatches panel, simply click a swatch of the color to which you want to change the selected fill or stroke. Ai will apply the color to the selected object and will update the Current Color.

Create a Local Color Swatch

Screen shot of the New-swatch Dialog Box
The "New Swatch" Dialog Box

To create a swatch and add it to the Swatches panel in Adobe Illustrator:

  1. Go to the Swatches panel.
  2. Use the Color panel, Color Picker, or the Color Guide panel to change the Current Color to the color that you want to add as a swatch.
  3. Click on the New Swatch icon at the bottom of the panel. Ai will display the New Swatch dialog box.
  4. In the New Swatch dialog box, give the swatch a name and uncheck the Global checkbox to make the new swatch an ordinary, local, color swatch.
  5. Optionally, check the Add to my Library checkbox to tell Ai that you want the color added to your library.
  6. Click OK. Ai will add the Global swatch with that name to the Swatches panel and if you asked it to do so (by checking the checkbox at the bottom of the panel), Ai will also add it to your Library.

Create a Global Swatch

A Global swatch remains associated with all instances where you have used the Global swatch, and when you update a Global swatch, all the places where you have used instances of the Global color swatch will automatically update. In the Swatches Panel, Illustrator flags a swatch as Global by placing a small white triangle in the lower right corner of the swatch's icon.

To create a swatch and add it to the Swatches panel as a Global swatch in Adobe Illustrator:

Note that except for Step 4, the following procedure is the same as that for creating a "local" swatch.

  1. Go to the Swatches panel.
  2. Use the Color panel, Color Picker, or the Color Guide panel to change the Current Color to the color that you want to add as a swatch.
  3. Click on the New Swatch icon at the bottom of the panel. Ai will display the New Swatch dialog box.
  4. In the New Swatch dialog box, give the swatch a name and ensure that the Global check box, is checked. The Global setting is the default.
  5. Optionally, check the Add to my Library checkbox to tell Ai that you want the color added to your library.
  6. Click OK. Ai will add the Global swatch with that name to the Swatches panel and if you asked it to do so (by checking the checkbox at the bottom of the panel), Ai will also add it to your Library.
Screen shot of the Swatch Options Dialog
Swatch Options Dialog

Modify a Swatch

To update a document swatch in Adobe Illustrator:

  1. Go to the Swatches panel that you launch via Window > Swatches (not the compact version that you launch from the Appearance panel).
  2. Double click on the swatch.  Ai will display the Swatch Options dialog, which is identical to the New Swatch dialog.
  3. Use the Swatch Options panel to modify the swatch's name, color type, color numbers, color model, and check or un-check the checkbox to designate the color as Global. Unchecking the "Add to my Library" does not delete the color from your Creative Cloud library.

Loading PANTONE and other Custom Color Libraries

Screen shot of How to Use PANTONE and other Custom Color Libraries
Using PANTONE and other Custom Color Libraries

To load a color from a spot color library such as PANTONE in Adobe Illustrator:

  1. Click on the Swatch Libraries icon, the first one at the bottom of the panel. Ai will display a dropdown list of the available libraries.
  2. In the dropdown list, choose Color Books. Ai will display a sub-menu of formula books.  
  3. From the sub-menu, select book, such as PANTONE Solid Coated. Ai will display all the (possibly huge number of) swatches in the book.  
  4. Either (a) select a swatch visually, or use the search box to find the color by its number, e.g. PANTONE 1505 C. When you click the swatch, Ai will update the Current Color.

You can copy several swatches from a copy book to the Swatches panel by selecting them (using Ctrl + click) and dragging them into the Swatches panel.

Screen shot of Color Groups in the Swatches Panel
Color Groups

Create a Color Group

You can organize a document's swatches by creating Color Groups in the Swatches panel.

To create a Color Group in Adobe Illustrator:

  1. In the Swatches panel, select the swatches (Ctrl + click) that you want to add to a group.
  2. At the bottom of the panel, click the New Color Group (i.e., the folder icon0. Ai will launch the New Color Group dialog.
  3. Give the Color Group a name and click OK. Ai will add to the Swatches panel, a Color Group of that name, which it will represent as a folder icon followed by s string of the selected swatches.

You can add a swatch to the Group by dragging it to the end of the string of swatches. When you see a blue line. release the mouse button, and Ai will dock the swatch there and add it to the Color Group.

Loading Thematic Color Libraries

llustration of Comparison between Thematic vs. Color Book Members of the Library
Comparison of Thematic vs. Color Book Members of the Library

Thematic color libraries are organized into small collections of Color Groups.

To load a group color from a thematic library member in Adobe Illustrator:

  1. Click on the Swatch Libraries icon, the first one at the bottom of the panel. Ai will display a dropdown list of the available libraries.
  2. In the dropdown list, choose one of the thematic groups, such as Art History. Ai will pop-out a sub-menu. 
  3. From the sub-menu, select a category, such as Renaissance. Ai will display a collection of Swatch Groups.
  4. From the collection, click a Color Group, such as Renaissance 1, to copy it to the Swatches panel.
Screen shot of Creating a Color Group to add to the User Defined Library
Creating a Color Group to add to the User Defined Library

Create a Custom Member of the Swatches Library

To create a member of the User Defined Library category in Adobe Illustrator:

  1. Create a new document.
  2. Clear out all the colors from the Swatches panel.
    1. Click the first (white) swatch,
    2. Shift + click the last swatch,
    3. Click the Trash Can icon.
  3. In the Swatches panel, click the Color Group (folder) icon to make and name a new color group.
  4. Create the swatches that you want to be part of the Group. For example, use a client's brand guide or create swatches using a Harmony Rule in the Color Guide panel.
  5. As you make each swatch, move it to the new Color Group.
    Screen shot of a how to create New Member Added to the User Defined Category in the Libraries panel
    A New Member Added to the User Defined Category in the Libraries Panel
  6. Go to the Swatch panel's top right corner dropdown menu and select Save Swatch Library as ASE. Ai will add the color group as a member of the User Defined Library, which is the folder \AppData\Roaming\Adobe\Adobe Illustrator 24 Settings\en_US\x64\Swatches.

Color Resources

Name that Color Translates Hex to Color Names.
Named Colors and Hex Equivalents Translates Color Names to Hex.