In ordinary language, the terms Transparency and Opacity are opposite, mutually exclusive, absolute concepts, i.e., an entire object cannot be both transparent and opaque. Illustrator uses both terms (though it favors Opacity), not to refer to either concept, but to refer to translucency, the degree to which you can see through an object. In Illustrator, Opacity is a quantity with a standardized range between 0 and 1, where 0 is transparent and 1 is opaque. So, illustrator introduces the idea of the degree of opacity, which it represents as a percentage (0% opaque to 100% opaque).
This page covers topics related to transparency, including:
Illustrator's Opacity Facilities
Blending Modes
Masks
Printing and Transparency
Illustrator's Opacity Facilities
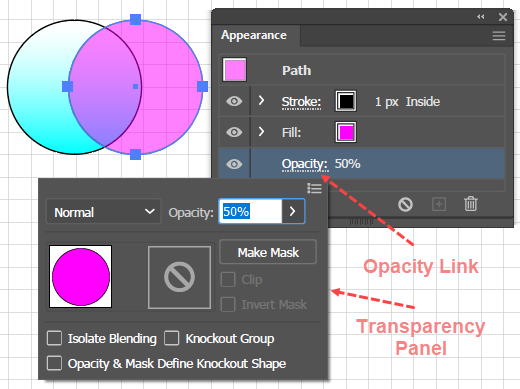
The commonest and easiest way that most users interact with Opacity is via the Appearance panel, which shows the opacity setting for each object and for each of its fills and strokes. When you create an object, AI sets the default opacity to 100%. The label of the panel's Opacity setting field is a link control. Clicking the control opens the Transparency panel, which then displays the Transparency settings for the selected fill, stroke, or object. (Note that Gradient color stops and Gradient Mesh points also have Opacity settings.)
Setting Opacity
Setting Opacity
To set an object's opacity in Adobe Illustrator:
Select the object in the Layers Panel or on the Artboard.
Target the entire object (Path), one of its fills, or one of its strokes in the Appearance panel.
Click the Opacity link for the targeted item. Ai will drop down a view of the Transparency panel. (You can reach a stand-alone version of the Transparency panel via the menu operation: Window > Transparency).
Go to the Opacity field, and type in a value or click the down arrow to show a slider that allows you to set the opacity interactively by eye.
Transparency Grid
Hint
To highlight the degree of an objects' opacity on the Artboard, you may find it helpful enable the Opacity Grid background (View > Show Transparency Grid).
Appearance Panel
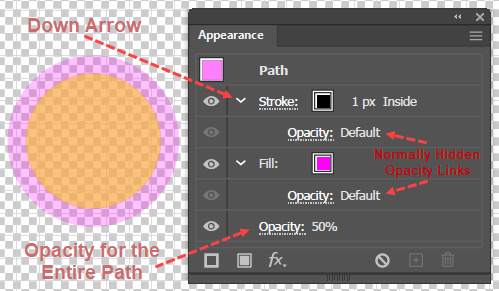
Normally Hidden Opacity Links allow you to set opacity for the fill and stroke as well as the entire path
When you have selected an object in the Layers panel, Ai will automatically target it, which will make the Appearance panel display its attributes. For example, if you select a path object, the Appearance panel will show settings for the fill and stroke. By default, the Appearance panel will show only the Opacity link, for the entire Path, which will be at the bottom of the panel. However, the rows for the fill and stroke attributes have a down pointing arrow, which when clicked will expose an Opacity link for the fill and stroke rows, you can expose the Opacity Link for the fill and the stroke. Consequently, you can, as the accompanying image shows, set an opacity for any combination of the fill, the stroke, or the entire path. Of course, that leaves the opacity setting for the entire path's, looking somewhat out of the mainstream of things, still at the bottom of the panel. However, this placement makes sense if we recall that Ai renders appearance attributes from the bottom to the top of the Appearance panel. To give the entire object the same opacity setting, Ai must implement that opacity setting first (before it implements those for individual fills or strokes that are higher in the stacking order.
Transparency Panel
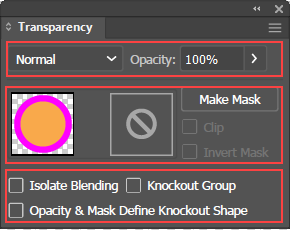
Geography of the Transparency Panel
The Transparency panel has three rows for:
Setting Opacity, Blending Mode, or both.
Creating Opacity Masks (for which you will probably want to launch the Transparency panel on its own, rather than to access it via the Appearance panel.
Auxiliary Options:
Isolate Blending restricts the scope of blending to a Group of objects at one level in the stacking order.
Two additional options that control how objects with opacity and blending should print.
If you do not see all the controls, click the flyout (hamburger) menu, and choose the Show Options item.
Blending Modes
The Blending Modes dropdown box choices determine if and how an object, or its fills or its strokes will interact with the appearance of overlapping objects that are belowit in the stacking order. The default blending mode is Normal, which means that there is no interaction.
There are 16 Illustrator blending modes, each of which is defined by a mathematical formula that is based on a standardized luminosity value. Standardized luminosity (grayscale) values range from darkest (0) to lightest (1).
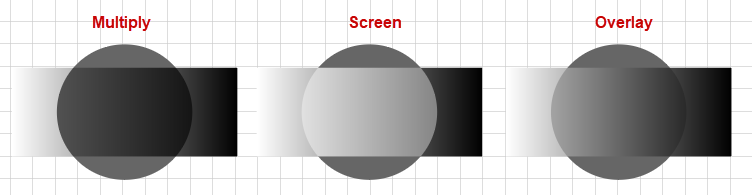
A simple example shows how luminosity values are used in blending mode calculations. To calculate the result of the Multiply blend mode for two overlapping regions, Ai multiplies the luminosity value of the top times the luminosity value of the bottom object. For example, if in the overlapping region, the value of the top object is 0.8 and the bottom object is 0.5, the result is 0.8 x 0.5 = 0.4, i.e., the region is darkened. If the top layer had been twice as dark, say 0.4, the result would have been 0.4 x 0.5 = 0.2. The darkness of the top layer makes the bottom layer proportionally darker.
There are three prototype blending modes. In a configuration in the accompanying figure, where there are two overlapping objects, we would see the following:
Prototype Blending Modes
Multiply darkens. Darker areas in the top area make all areas in the bottom layer proportionately darker. White areas (luminosity 1) in the top layer have no effect.
Screen lightens. Lighter areas in the top layer make all areas in the bottom layer proportionately lighter. Black areas (luminosity 0) in the top layer have no effect.
Overlay increases contrast and the effect depends on the bottom layer. Middle tones in the bottom layer have no effect, but darker tones are darkened, and lighter tones are lightened.
Creating a Blend
Creating a Multiply Blend on the Fill of the Selected Bar, which is on Top of the Circle
The fill and stroke of an object as a whole, or any of its fills or strokes individually may blend with those of any object with which it overlaps, and which is below it in the stacking order.
To make a set of two or more objects blend with one another in Adobe Illustrator:
Optionally, if you want to confine (isolate) the object's blending to just the objects in the set and not with other objects below them, put the objects in a Group. As explained below, Ai's Isolation settings only work on groups.
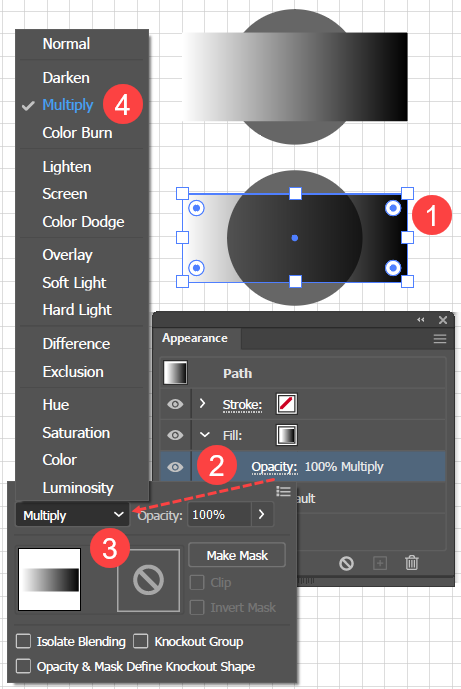
In the Layers panel, or on the Artboard, select the top object.
In the Appearance panel, click on the label of the Opacity setting of the attribute to which you want to apply a blending mode. Ai will drop down the Transparency panel.
In the Transparency panel, click the down arrow to popup the list of blending modes.
Choose a Blending Mode. Ai will apply the blending mode.
Isolate Blending
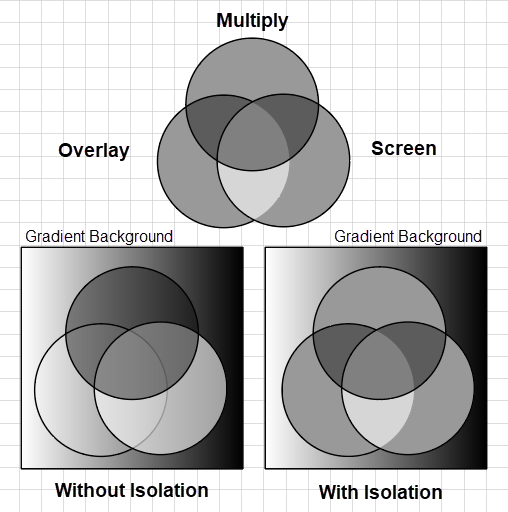
The principle that an object with a blending mode will blend with all overlapping objects below it in the stacking order, can produce unwanted side effects when you have several objects with blending mode settings (other than "Normal").
Identical Groups without a Background; and on a Background, with and without Isolation
To take a common example, suppose that you have several objects in a Group, and you have set their blending mode so that they blend properly with one another. The fact that the scope of an object's blending mode setting extends to all overlapping objects below it in the stacking order, means that blending will not be limited to the objects in the Group, but will reach down to any object (such as the Gradient in the accompanying figure) that happens to be below an object in the Group.
The Opacity panel's Isolate Blending function restricts blending to objects inside a group. You use the Transparency panel's Isolate blending function when you want to limit the scope of blending. That is, you want several objects to blend with one another, but not to blend with any of the objects below them in the stacking order.
The Isolate function restricts blending to objects inside a group. You use the Transparency panel's Isolate blending function when you want to limit the scope of blending. That is, you want several objects to blend with one another, but not to blend with any of the objects below them in the stacking order.
To create a set of objects that blend only with other objects within the set and not with other objects below them in the stacking order in Adobe Illustrator:
Put the objects in a Group. Isolation only works on groups.
In the Layers panel, select the group.
In the Appearance panel target the object or one of its fills or strokes.
Go to the Transparency panel and ensure that the options are showing (in the fly-out menu, choose Show Options).
At the bottom of the Transparency panel, click the Isolate Blending checkbox.
Overprinting with Blending vs Knockout
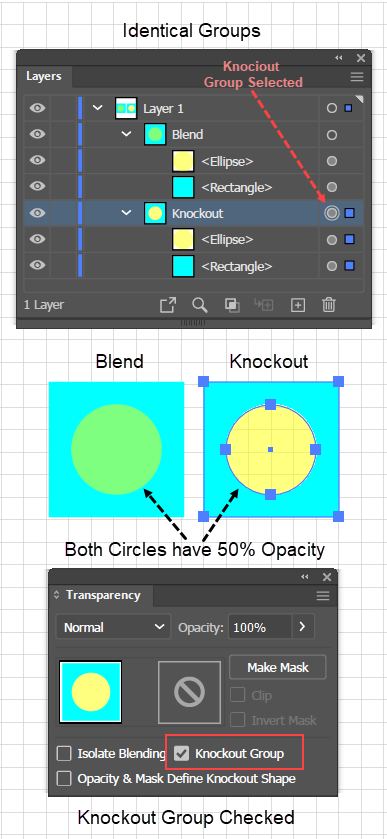
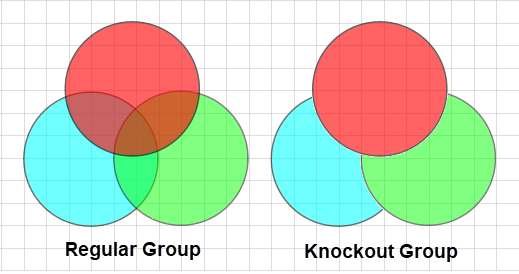
The term "knockout" derives from the nomenclature of color separation printing in which an object that is to be printed on top of another object of a different color, removes or "knocks out" the color in the overlapping area of the object beneath it. If the color in the overlapping area of the lower object were not removed, the different colored inks would blend in the process as layers of colors are added.
In the group on the left, the 50% opaque yellow of the circle blends with the blue of the square. In the knockout group on the right, the circle "knocks a hole out of the square, and because of the 50% opacity, you can see the background through it.
In the CMYK color mode knocking out is the default behavior. The opposite of "knockout" behavior (i.e., the case where you actually want the inks to blend) is called "overprinting." You can specify overprinting in the Attributes panel by checking the Overprint Fill checkbox. You can see the effect of the knockout or overprinting processes in the Window > Separation Preview panel.
However, the usefulness of Knockout Groups is not limited to print and CMYK colors. More generally, Knockout Groups prevent blending. Furthermore, whenever you reduce an object's opacity, you always create blending with any overlapping objects that are below it. The purpose of a knockout group is to prevent blending among the objects that are within a group.
Create a Knockout Group
In contrast to the Isolate function, which restricts blending to inside a group, the Knockout Group function restricts blending to outside the group. You use a Knockout Group when you have a set of translucent objects that overlap one another, and you want the objects to be translucent with respect to objects on lower layers in the stacking order, but not be translucent with respect to one another. That is, within the group, objects that are higher up in the stacking order should knockout objects that are lower in the stacking order, but objects within the group, should still blend with objects that are outside the group.
The Knockout Group Prevents Blending within the Group
To create a Knockout group for overlapping translucent objects in Adobe Illustrator:
Put the objects in their own container (group or layer). For purposes of Knockout groups, multiple strokes on the same object act as if they are in the same group.
In the Layers panel, target the container.
Go to the Transparency panel and ensure that the options are showing (in the fly-out menu, choose Show Options).
Click the Knockout Group checkbox until it shows a check mark.
Note: in addition to the checked and unchecked state, the Knockout Group checkbox also has a neutral state, which shows as a dash. The neutral setting is the default and is useful when a group is nested inside of another group. It prevents a nested group from inheriting the knockout setting of its container.
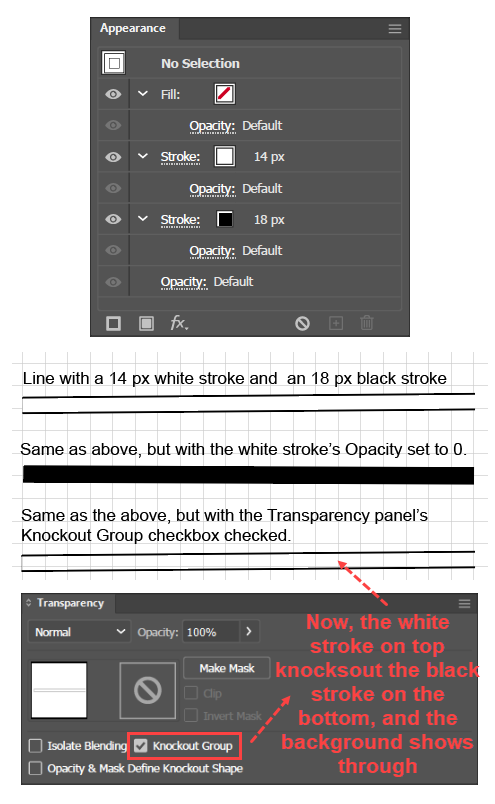
Knockout with Multiple Fills and Strokes
Two Strokes on the Same Line Acting Like a Knockout Group
A path with several fills or several strokes can function as a quasi-group and therefore, can also have the Knockout Group property. For example, the accompanying figure shows a line with two strokes, a thick black stroke below a slightly narrower white stroke. With the Knockout checkbox checked, the white, top stroke will knockout the bottom black stroke, enabling you to see through the previously white region.
The accompanying figure illustrates not only that a line with two strokes can function as a knockout group, but that a transparent stroke can knockout one that is fully opaque.
To make a path with two strokes (or fills) have knockout behavior in Adobe Illustrator:
Select the path with two strokes (or fills).
In the Appearance panel, target not one of the strokes (or fills), but the path itself.
In the Transparency panel, make the path into a quasi-knockout group by checking the Knockout Group checkbox.
Forcing an Object in a Knockout Group to Blend
This feature is applied, not to a group, but to an object. It allows you to undo the effect of the knockout group for the target object to which the setting is applied. It applies when:
The object is inside of a group.
The group has the Knockout Group setting enabled in the Transparency panel).
The objects in the Knockout Group have both:
An opacity less than 100%and
A blending mode setting (other than the default).
Using the Opacity & Mask Define Knockout Shapes Checkbox
To undo the effect of the knockout group for an object in the group in Adobe Illustrator:
Select the object that you want to blend with the objects below it.
Go to the Transparency panel.
Check the "Opacity and Mask Define Knockout Shapes" checkbox. Ai will undo the effect of the Knockout Group for the selected object and it will blend with the shapes below it.
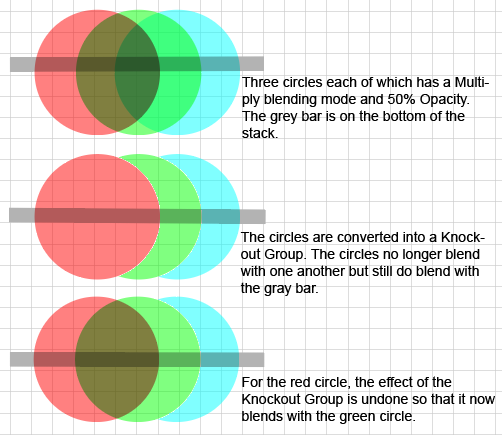
Example:
Example of the effect of applying the "Opacity & Mask Define Knockout Shapes" checkbox property to an object in a Knockout Group
The accompanying figure shows an example The procedure for building one like it is as follows:
Create a group of 3 or more overlapping shapes.
For each of the shapes:
Select the shape.
In the Appearance panel, target its path.
In the Transparency panel:
Set its blending mode to a value other than "Normal."
Set its opacity to less than 100%.
Place all the shapes into a group.
Target the group and make it a Knockout Group.
Target one of the objects (e.g., the red circle).
In the Transparency panel, check the "Opacity & Mask Define Knockout Shapes" checkbox. Ai will undothe effect of the Knockout Group for the targeted object.
Masks
Illustrator provides two types of masks:
Clipping Masks, which are software objects that use a vector path (called the Clipping Path) to restrict the visibility of other objects to the inside of the Clipping path. Clipping masks use the structure of the Clipping Path to define the visible area. Consequently, clipping masks always have sharp edges. You make a Clipping Mask via the Object > Clipping Mask > Make command.
Opacity Masks, which are software objects that use one object's luminosity (grayscale values) to restrict the visibility of other objects, so that they appear partially transparent through the masking object. By default, the white areas of the hole-object are transparent, black areas are opaque, and the gray areas are translucent in proportion to their luminosity. Because they depend, not on a discrete structure, but on a continuous quantity (luminosity) the edges of Opacity Masks may be fuzzy or feathered.
Both types of Masks are non-destructive, that is:
The masked objects are not destroyed.
You can undo the mask and recover the objects that were used to create the mask:
You can edit the masked objects without having to first undo the mask, edit the objects, and then recreate the mask.
In ordinary language a mask, e.g., a Carnival mask, is a covering that hides the face, except for several small holes for the eyes or mouth. In Illustrator, a Mask is an object that hides some art, except for a hole through which a part of the art is visible. However, Illustrator Masks differ from ordinary masks in that:
The point of a regular mask is to hide the face, whereas the point of an Illustrator Mask is to show the art only through the hole.
Regular masks have several small holes, Illustrator masks usually have only one hole, but you can create Masks with several holes.
Regular masks merely cover the face, but the mask itself is still visible and occupies space. They do not make the hidden parts of the wearer's face disappear. In contrast, Illustrator Masks do not occupy space, and make the hidden parts disappear, so that you can see through the hidden portion of the mask to any objects beneath it.
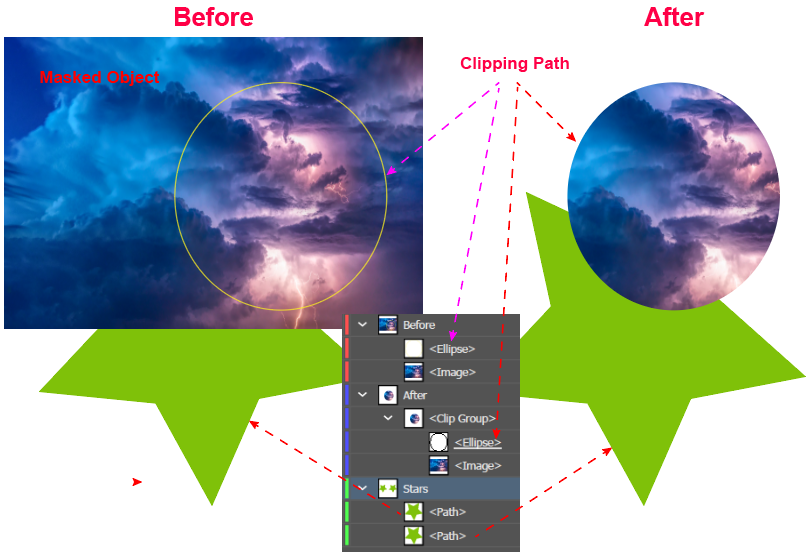
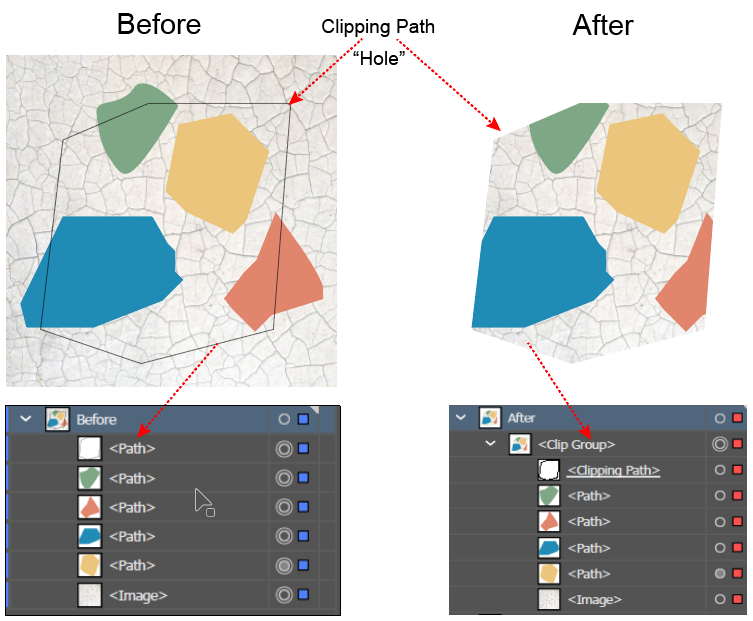
Illustration of the Artboard and the Layers panel before and after applying a Clipping Mask, with a circular Clipping Path, to a raster image. While the circle and the image remain in the Layers panel, on the Artboard, the hidden parts of the image occupy no space, leave no trace on the star that is on the Layer under the Mask.
A Clipping Mask provides a superior alternative to cropping artwork, such as an image or a drawing made up of vector objects. Like cropping, it hides parts of the objects that fall outside a particular shape. But unlike cropping, a Clipping Mask does not destroy any parts of the objects or even the shape through which the objects are visible. They remain available for you to edit.
To mark the difference between cropping and using a Clipping mask, the objects "behind" the Mask are said to be masked objects and are said to be clipped to the shape of the mask.
The shape that defines the visible portion of the mask is called the Clipping Path. Before you create the Mask (with the Object > Clipping Mask > Make command) you create this path in the usual way and place it above the objects that you want to mask. After you create the Mask, Ai will incorporate the Clipping Path into a software object, called a Clipping Set, which programmatically shows the objects inside the Clipping Path and hides the objects that fall outside it. In the Layers panel, Ai shows the Clipping Set as a Group that it gives the default name "<Clip Group>". The hidden objects are not just covered up, they disappear and do not take up any space on the Artboard. So, for example, you can move another object so that it is directly adjacent to or under the visible portion of a mask without seeing any trace of the hidden area around the masked objects.
Here are the rules for using Clipping Masks:
The Clipping Path must be a vector object. Text can function as a clipping path. In contrast to Opacity Masks, the fill and stroke of the Clipping Path are irrelevant. If the Clipping Path has any appearance attributes, Ai throws them away.
The Target objects can be either vector objects or an image.
You can make a Clipping Mask in two ways:
Executing the Object > Clipping Mask > Make on:
Several selected objects,
The objects in a group or Layer.
Two Layers.
Using the Draw Inside function in the button in the Tools panel.
You must always place the Clipping Path above the objects that you want to clip to the shape of the mask.
Since a Clipping Mask is non-destructive, and preserves both the Clipping Path and the masked objects, you can edit them at any time without having to delete the existing mask, make the edits, and recreate the mask.
In addition, you can add new masked objects to a Clipping Set. As an important consequence, any new path that you draw inside of a Clipping Set, will terminate at the boundary of the Clipping Mask. This can be a helpful way to confine the drawing process to a specific area of the artboard. See Live Mirror - Symmetrical Drawing - Adobe Illustrator by hikeart for an example that uses the Transformation Effect to draw figures with mirror reflection symmetry interactively. The Clipping Mask ensures that the newly drawn paths do not appear to cross the axis of symmetry.
Creating Clipping Masks
You can create a Clipping Mask in any of the following ways.
Make a Clipping Mask from a Layer
Create a clipping mask from the objects in a Layer
To create a clipping mask from the objects in a Layer in Adobe Illustrator:
Place the Clipping Path at the top of the Layer.
Select the Layer. Ai will select and target all of its contents.
Execute the command Object > Clipping Mask > Make. (Ctrl + 7). Ai will:
Create a group, with the default name Clip Group, and place both the Clipping Path and the selected contents of the Layer inside of it.
Signal that the Clipping Path is now being used as a Mask by showing it in the Layers panel with an underline.
When it becomes part of the Clipping Set, the Clipping Path loses any of its appearance attributes and functions only as the path structure.
You can also execute the Clipping Mask > Make. (Ctrl + 7) command from the Left mouse button pop up menu.
The Make/Release Clipping Mask button in the Layers Panel produces a different structure, which does not make a Clip Group, but only converts the top shape into a Clipping Path.
You can also mask the objects in a Group. Simply place the Clipping Path above the Group, select both the Clipping Mask and the Group, and execute the Object > Clipping Mask > Make. (Ctrl + 7) command.
Make a Clipping Mask from a Selection of Objects
To create a clipping mask from several selected objects in a Layer in Adobe Illustrator:
Draw the Clipping Path (i.e., the shape that you want to define the boundary of the mask).
Place the Clipping Path above the to-be-masked objects.
Select the Clipping Path and the objects that you want to be masked (i.e., to become part of the Clipping Set).
Execute the Object > Clipping Mask > Make command. Ai will:
Create a group, with the default name Clip Group, and place both the Clipping Path and the selected contents of the Layer inside of it.
Convert the Clipping Path into the Mask, which Ai will show in the Layers panel with an underline.
Make a Clipping Mask from Text
To create a clipping mask from text: in Adobe Illustrator:
Create the text, placing it above the to-be-masked objects.
Select the text and the to-be-masked content and execute the Object > Clipping Mask > Make command. Since the Compound Shape command is non-destructive, the text will remain editable.
Make a Clipping Mask with the Draw Inside Method
To create a clipping mask with Draw Inside in Adobe Illustrator:
Select the shape that you want to become the Clipping Path and click the Draw Inside radio button icon in the Tools panel. Ai will place dotted lines at the corners of the path.
Draw a new path over the shape or copy and paste something on top of the shape. Ai will:
Create a Clip Group, place the Clipping Path at the top and place the newly drawn path or copied paths just below the Clipping Path.
Convert the Clipping Path into a Mask, which will be underlined in the Layers panel.
Make a Clipping Mask from Two Layers
You can add a Layer and use it to mask the contents of the objects on the Layer beneath it.
To make two layers function as a Clipping Set in Adobe Illustrator:
Create a new Layer above the Layer whose contents you want to mask.
Put a Clipping Path, by itself, in the top Layer.
Select both layers.
Execute the Object > Clipping Path > Make command. Ai will create the Clipping Group in the top Layer, make its lone Clipping Path into the mask, and then move the contents of the bottom Layer into the Top Layer, at a location in the Clip Group that is just under the Clipping Path.
Creating a Clipping Mask with Multiple Clipping Paths
Clipping Path made from 3 rectangles and a Trapezoid.
To create a clipping mask that has several holes in Adobe Illustrator:
Create and Select the shapes that you want to combine into a Clipping Path.
Execute the Pathfinder > Unite command. The Layers panel will show a single path. If you do not do this step, the lines where shapes overlap may show as thin lines.
With the united path selected, execute the Object > Compound Path > Make Command. In the Layers panel, Ai will show that it has converted the united path into a Compound Path.
Select the Compound Path and the to-be-masked object or objects, and execute the Object > Clipping Mask > Make command. In the Layers panel, Ai will create a Clip Group that contains the Compound Path as the Clipping Path (which now has an underline) and the masked object or objects.
To edit the shapes that make up the Compound Clipping Path:
Select the Clipping Path and then click the direct selection tool. Ai will display the anchor points, and control handles of the shapes that make up the Compound Path.
Edit the shapes in the usual way.
For a compelling example of this technique that uses a Clipping Path made of a grid of hexagonal shapes, see 3 Illustrator Clipping Mask Uses You NEED TO KNOW from Satori Graphics, starting at position 2:00.
Editing Clipping Sets
Since creating a Clipping Set does not destroy either the Clipping Path or the objects that are visible inside the masked objects, you can edit the contents of the Clip Group in Isolation Mode as you would any other objects in a normal group.
You can edit both the:
Clipping Path itself, and
Objects in the Clipping Set
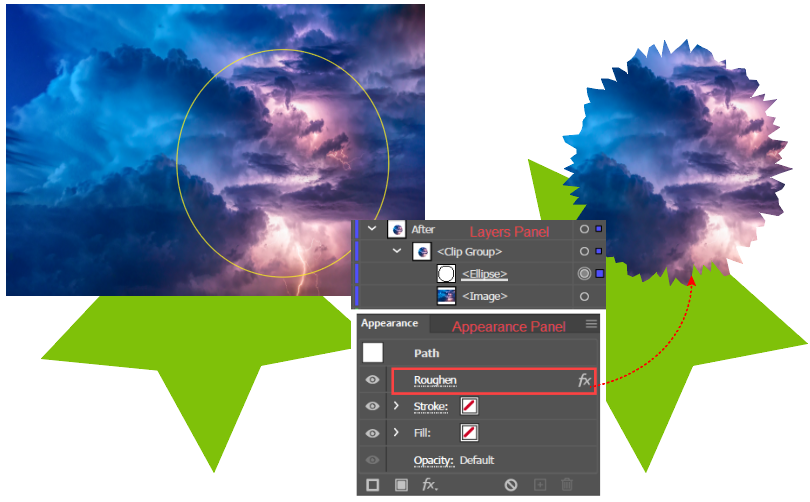
Editing the Clipping Path
Clipping Path modified with the Ruffen Effect
To edit the Clipping Path object in the Clipping Set in Adobe Illustrator:
In the Layers panel, open the Clip Group, Select and Target the (underlined) Clipping Path (not the Clip Group). The Artboard will show the selection boundary, and the Appearance panel will show that the selected item is a Path. You can now do any of the following to the Clipping Mask path:
Move the Clipping Path relative to the masked objects.
Apply fills or strokes.
Apply a Live Effect.
Direct Select the path and edit its Anchor Points and Control Handles.
Editing-the-Masked-Objects-in-the-Clipping-Set
To edit the objects under the Clipping Path in the Clip Group in Adobe Illustrator:
In the Layers panel, go to the Clip Group, and then Select and Target the masked object. Alternatively, on the Artboard click on the object. The Clip Group will behave like a normal group and the Artboard will enter Isolation mode. Continue clicking until you have selected the object.
To edit the object's appearance, with the item selected:
Move the object relative to the Clipping Path.
Apply fills or strokes.
Apply a Live Effect.
To edit the object's structure:
With the object still Selected and Targeted in the Layers panel, click the Direct Selection tool. Ai will display the anchor points, and control handles of the shape or shapes that make up the Clipping Path.
Edit the anchor points and control handles in the usual way.
Opacity Masks
Opacity Masks, like Clipping Masks, build the mask from a Mask Object, which you initially place above the Target (i.e., the object that is to be masked). Then you use the mask-building command to incorporate the Mask Object and the Target into an Object, which in the case of the Clipping Mask is the Clipping Group and in the case of the Opacity Mask is the mask structure that you see represented in the Transparency panel.
Opacity Masks differ from Clipping Masks in several respects. Clipping Masks use only the structure (i.e., the outline) of the Mask Object (the Clipping Path) to completely show or completely hide the Target (i.e., the to-be-masked) object. As a result, the opacity of the Target is always 100%, inside the Mask Object (the Clipping Path), or 0%, outside the Clipping Path. The visibility of Background Objects (i.e., objects that are lower in the stacking order than the Target, are unaffected by the masking process.
Opacity Mask Structure
Showing an Opacity Mask That Simulates a Clipping Mask by Using a Pure White Masking Object
In contrast, Opacity Masks use the luminosity (the grayscale value) of a Mask Object to determine the degree of the opacity of the Target. That is, the opacity of the Target can vary from location to location inside the mask, in direct proportion to the degree of the Mask Object's luminosity. Finally, had here is a major difference, where the opacity of the Target is less than 100%, you will be able to see the content of background objects that are under the Target in the stacking order.
Clipping Masks and Opacity Masks also differ in that for Clipping Masks the clipping path, must be a vector path, for Opacity Masks, the Masking Object may be an image.
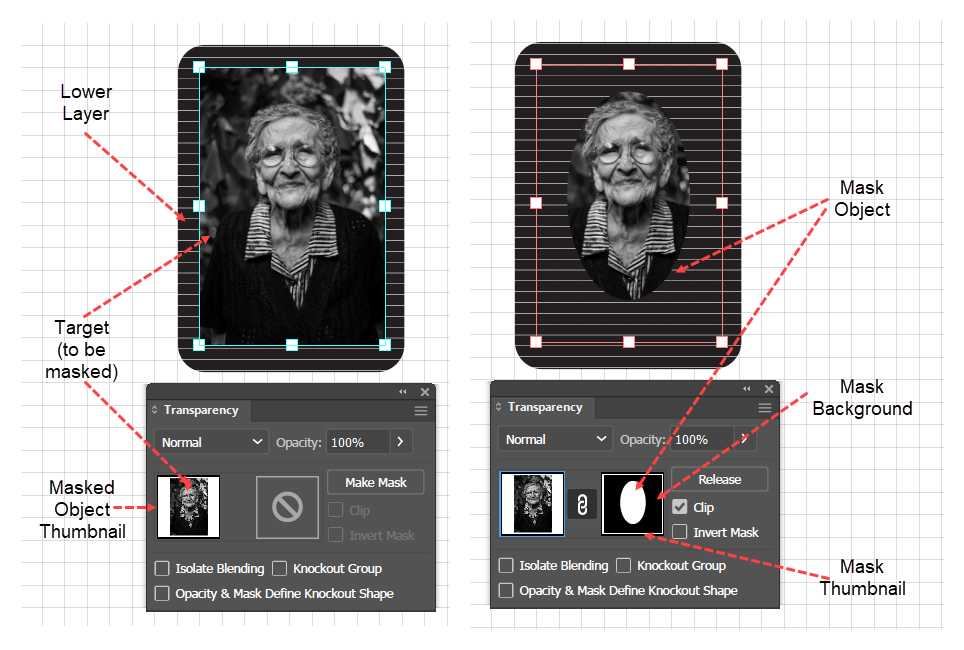
A Masked Object (an object to which Ai has applied a mask) becomes a Live object, which like a Live Shape remains editable. Illustrator's process for making an Opacity Mask integrates two software components:
A Mask, which is the software component that controls the visibility of the target. When you have created the Masked Object, you will see the Mask in the right thumbnail of the Transparency panel. The Mask is a combination of two components:
A Mask Object, which is an Artboard object that is, as usual, represented in the Layers panel by a row that shows the object's name and thumbnail. When you use the Transparency panel to create a mask, the luminosity of this object will control the opacity of the Target. Even after you create the mask, this object remains editable, but the process is not so simple as it is in the case of editing Clipping Masks.
A Mask Background, which (as in Clipping Masks) is not a real Artboard object, but a purely virtual black or white background that you see behind the Masking Object in the Transparency panel. You set the color of the Mask Background with the Clip checkbox in the Transparency panel.
A Target Object, which is the Artboard object to which you want to apply the mask, and which you see in the left thumbnail of the Transparency panel.
When you create the mask (in the Transparency panel), Ai combines the Mask (with its Mask Object and Background), and the Target object into the Masked Object. In the Layers panel, Ai represents the Masked Object by placing a dashed line under the name of the Target Object. When you select the Masked Object in the Layers panel or on the Artboard the Transparency panel will display the components of the Masked Object, and you enter isolation mode so that you can edit the mask.
Here is how it works:
The degree of a mask's luminosity at a particular location determines the opacity of the Target at that location.
If at a particular location, the mask is black (luminosity 0%), the opacity of the target will be 0%, i.e., the target will be completely invisible, and you will be able to see the lower layers beneath the Target. Black in the mask conceals the target.
If at that location, the mask is white (luminosity 100%), the target will be 100% opaque, i.e., the Target will be completely visible, and you will be unable to see anything on the layers beneath the Target. White in the mask, reveals the target. If at that location, the mask is a shade of gray, the opacity of the target is proportional to the lightness of the image.
If at that location, the mask is a shade of gray the opacity of the target will be proportional to the lightness of the image. For example, if a point on the mask is 60% white, the corresponding point on the mask 60% opaque. So, at that point, you will see 60% of the target, and 40% of the objects on the underlying layers.
The color of the masking object does not matter, because Ai uses only the grayscale equivalent of the masking object. When you create the mask, Ai will create a container object and will display images representing its contents in the Transparency panel.
Creating an Opacity Mask
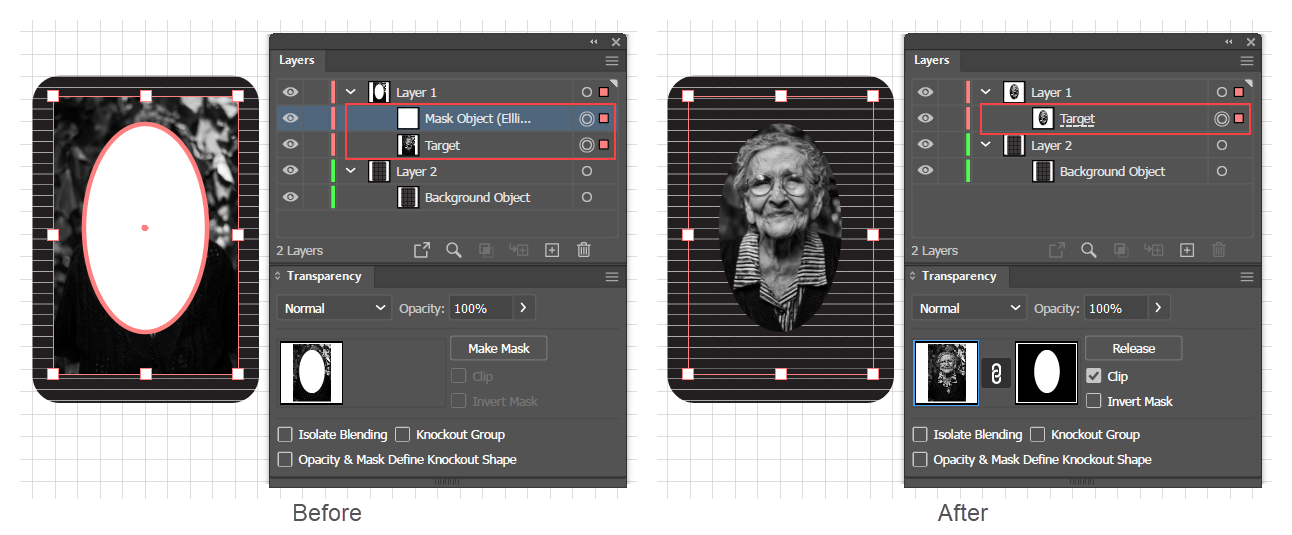
Before and After Screenshots Show How the Make Mask Process Captures the Mask Object and the Target Object and Puts them into Its Own Container
Place an object that you want to be the masking object on top of the target (i.e., the to-be-masked object). The target can be a single object, a group, or a layer.
Give the masking object an appearance that changes its grayscale value (e.g. a blur, a gradient, a reduced opacity, an effect, or a gray scale image).
Select both the Mask Object and the Target object, as illustrated in the right half of the accompanying screen shot.
Open the Transparency panel (Windows > Transparency). In the left thumbnail, Ai will show a preview of the selected objects.
In the Transparency panel, click the Make Mask button, Ai will:
Replace the Mask Object and the Target in the Layers panel, with an Opacity Mask container, giving the new container the same name as the Target, but with an underline. The Opacity Mask container still contains the Mask Object, and the Target and you can still edit them, but you cannot open the Opacity Mask container as easily as you would a group.
Show a preview of the target object on the left thumbnail, and show a preview of the mask on the right thumbnail. In the mask, black (luminosity 0) represents 0% transparency and white (luminosity 1) represents 100% transparency.
Check the Clip checkbox by default. The Clip checkbox turns the background black (representing 0% transparency, i.e., opaque). Unchecking the Clipping checkbox makes the entire mask white (i.e., entirely transparent).
Change the Make Mask button to a Release button.
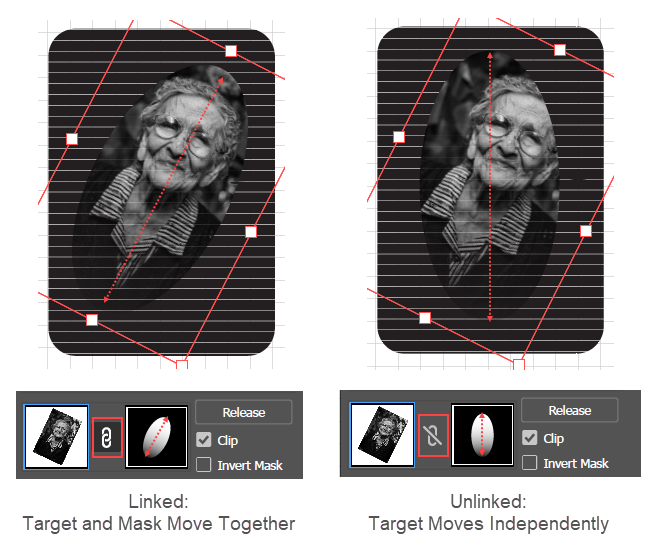
Show a Link icon between the target thumbnail and the mask thumbnail.
Display an Invert Mask checkbox. This simply reverses the virtual Luminosity of the Mask Object, but does not reflect this in the right thumbnail.
In the Layers panel, Ai signals that an object is an opacity mask container by giving it a dashed underline. Even though it contains the Mask Object, the Mask Background, and the Target, In the Layers panel, the opacity mask container does not have a down-pointing arrow next to it that you can click to see its contents, and you cannot simply click on the container (with its dotted underline) to enter isolation mode and edit its contents. You can, of course, undo the mask (via the Release button in the Transparency panel), edit the components, and then re-make the mask. However, Illustrator provides some alternatives which may be easier.
To access the contents of an opacity mask, without undoing and redoing the mask, you can open the Transparency panel and use its controls and its left and right thumbnails to edit the contents.
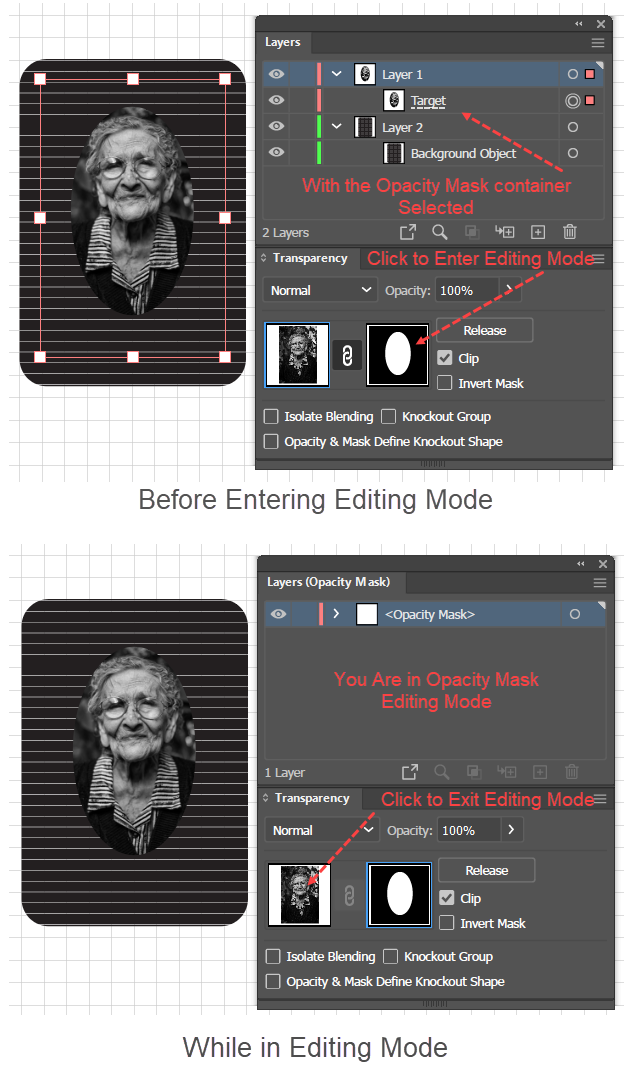
Enter Opacity Mask Editing Mode
To enter Opacity mask editing mode in Adobe Illustrator:
In the Layers panel, select the Opacity mask container object, the name that has a dashed underline.
In the Transparency panel, click on the right thumbnail (which displays the Mask Object and the Mask Background). You are now in editing mode. In the Layers panel, Ai will:
Change the title to read "Layers (Opacity Mask)".
Hide the normal Layers panel content (rows of layers and objects), and show a single line that reads <Opacity Mask>.
Exiting Opacity Mask Editing Mode
To exit Opacity mask editing mode in Adobe Illustrator:
In the Transparency panel, click the left thumbnail that displays the Target. You have exited editing mode. In the Layers panel, Ai will:
Change the title back to read, "Layers".
Show the panel's normal content (rows of layers and objects).
Editing an Opacity Mask Object
Mask Object Edited to Add a Gradient.
(For comparison, a copy of the new Mask Object is added at the side).
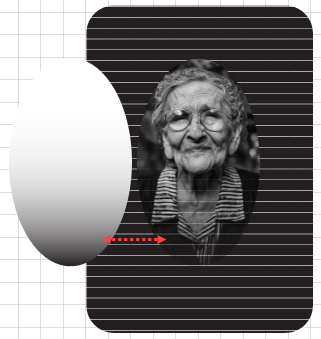
In the Transparency panel, Alt + Click on the right thumbnail, which shows the content of the Opacity Mask Container. On the Artboard, Ai will hide the other content of the Opacity mask container and show only the Mask Object.
On the Artboard, select the Mask Object. You can now edit its control points, fills, strokes, etc., just as you would any other object.
To temporarily hide an opacity maskin Adobe Illustrator:
In the Layers panel, target the opacity mask container.
In the Transparency panel, Shift + click on the mask-thumbnail to toggle it off and on.
Transparency Panel Mask Checkboxes
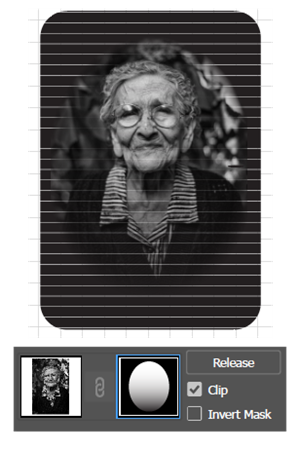
The Mask area of the Transparency panel has two checkboxes: Clip and Invert Mask.
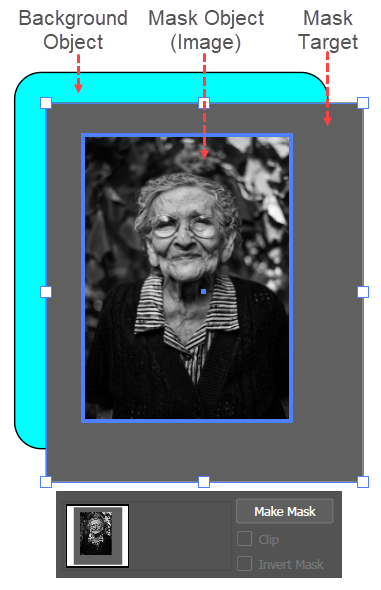
The first two accompanying figures show a before and after picture of making an Opacity mask in a scenario where there are the following objects:
The Mask Object (in this example the image),
The Mask Target, (the gray rectangle), and
A background object, at the bottom of the stacking order (the blue rounded rectangle). Note that this is not the virtual Mask Background which you define with the Mask Checkbox.
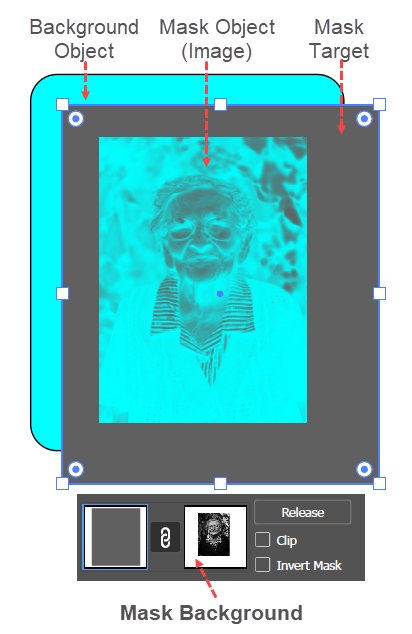
In the After picture, you can see the Clip and Invert Mask checkboxes, both of which are unchecked.
Note that the virtual Mask Background (which you set with the Clip checkbox), as always, covers the entire Target, but because it is white, it reveals the Target area, except where the Target's opacity is modified by the luminosity of the Mask Object, i.e., the image.
In the Image, its dark areas hide the Target (the gray rectangle) allowing you to see the blue of the Background Object (the rounded rectangle) below the Mask. Where the image is completely black (0% luminosity) it hides the gray rectangle (giving it (0% opacity) and the blue below the gray target is visible at 100% opacity. Parts of the gray target are visible only where there are whites and light grays in the image.
Before Scenario
After Creating the Mask
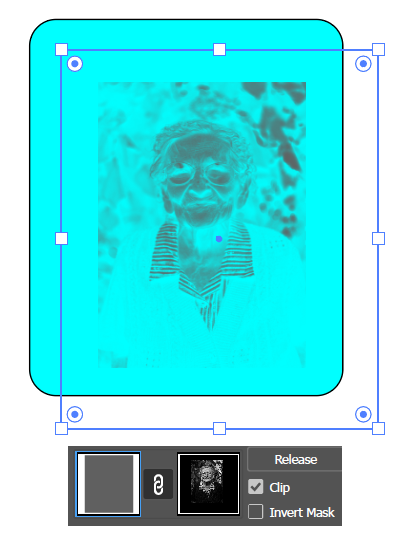
Inverting the Mask Background
Clip
The Clip checkbox in the Transparency panel toggles the Mask Background between white and black. The Mask Background covers the entire Target. When you first create an Opacity Mask, Ai might set the Mask Background to either black or white. White reveals all of the target, except for that covered by the Mask Object. So, black will conceal, and white will reveal all of the Target, that is not covered by the Mask Object.
To switch the luminosity of the internal Mask Background of an Opacity Mask in Adobe Illustrator:
Check or uncheck the Clip Checkbox. Ai will switch the mask between its show-all state (white) and its hide-all (black) setting.
So, in the accompanying figure the Mask Background is switched from white (as it was in the After figure) to black. Therefore, the hide-all, black Mask Background, hides the entire area of the Target that, in the After figure, was visible outside of the area controlled by the Mask Object, the image.
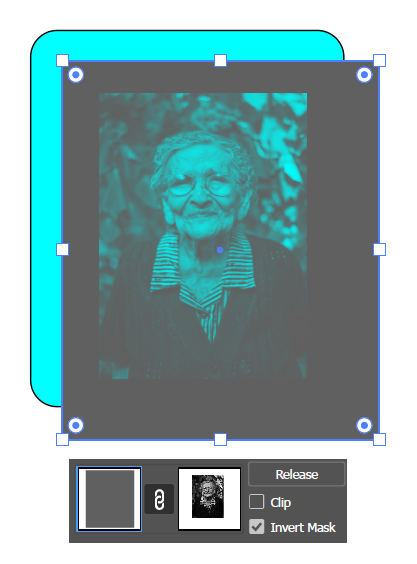
Inverting-an-Opacity-Mask
Invert Mask
Checking the Invert Mask checkbox reverses the luminosity values of the Mask Object and hence reverses the opacity values of the Target.
For example, suppose that some location on the Mask Object has a luminosity value of 60% (60% white) so that the Target at that point will be 60% opaque and 40% translucent, and consequently, objects (e.g., the blue rounded rectangle) under the Target in the stacking order will be 40% visible through the Target.
Checking the Invert Mask checkbox will change the luminosity value from 60% to 40%, so that the Target at that point will be 40% opaque and 60% translucent, and consequently, objects (e.g., the blue rounded rectangle) under the Target in the stacking order will be 60% visible through the Target.
To invert the luminosity of the Mask Object in an opacity mask in Adobe Illustrator:
Check the Clip Checkbox. Ai will invert the luminosity values at all points in the Mask Object, but Ai will not update the image of the Mask Object in the Right Thumbnail of the Transparency panel.
In the accompanying figure, the image no longer looks inside out, but the black parts of the before image are now the same gray as the Target, because the black parts of the image are now white allowing the Target to be visible at 100% of its opacity, which is a gray of luminosity 60%. The lightest parts of the original image are not dark, which makes them cut through the Target and show some of the underlying blue.
Printing and Transparency Flattening
Illustrator before version 9.0 was based on the PostScript file format, which did not support transparency. Illustrator is now based on the PDF file format, which fully supports transparency. However, many printers rely on PostScript which does not support transparency. Therefore, before it can be printed, a file with transparency may be prepared for printing by a process called Transparency Flattening. Flattening can be done manually (Object > Flatten Transparency), but Ai usually does this automatically when you send a file to the printer, and many print shops can use PDF files. If done manually, Transparency Flattening renders the overlapping regions un-editable (i.e., you can no longer move objects or change their blending mode).
Transparency Flattening must both (A) remove any blending of overlapping objects and (B) preserve the appearance. To do so, Ai breaks up the art into a group of "Atomic Regions," which knockout one another (i.e., when flattening Ai never overprints and blends). However, when a region has two or more complex appearances (such as gradients of different orientations) that cannot be rendered in PostScript, Ai must rasterize the region. Flattening Transparency will also rasterize Illustrator effects (e.g. a drop shadow). Therefore, a rasterized region is no longer scalable.
Ai may also rasterize what it calls Complex Regions for performance reasons if it thinks that in those areas the vector art is so complex that they will actually print significantly faster as a raster image. You can prevent Ai, from taking it upon itself to rasterize regions to speed performance by adjusting the Raster/Vector Balance setting in the Flatten Transparency panel. Setting the Raster/Vector Balance setting to 100% (or choosing the High-Resolution preset) prevents any rasterizing for performance. Setting the Raster/Vector Balance setting to 0% always rasterizes the entire file.
Text can become a casualty of the flattening process. Parts of text that appear under Effects (e.g. a drop shadow) that Ai must rasterize may get caught up in the rasterization. The result can look odd. To avoid this, keep all text in its own layer and make sure that the text layer is above all other layers.
Adjusting Flattening
To adjust the flattening settings, and identify the areas that, at the current setting, will be rasterized in the course of flattening in Adobe Illustrator:
Go to the Window > Flattener Preview.
In the flyout menu, choose Show Options and Detailed Preview.
In the panel, click the Refresh button.
In the Highlight dropdown, choose All Rasterized Regions.