Adobe Illustrator Smart Notes

Symbols

Overview

Dynamic Symbols is the name of a software feature that allows you to create an object, store it, and then reuse it many times:

  • Ai stores a document's Symbols in the document's Symbols panel, and can also store symbols (independently of any single document) in Symbol Libraries.
  • Once you create a stored symbol, you can use many replicas of it, called instances of the Symbol, on the Artboard.
  • The instances of a Symbol look like copies of the Symbol, but they are merely virtual, program objects that contain a link to the stored Symbol and have software that emulates the appearance of the stored symbol. Hence, Symbols have two important advantages:
    • Symbol instances do not significantly increase the file size.
    • Editing the stored Symbol changes the appearance of all the instances of the Symbol.
  • The Symbol instance software is smart. You can transform (move, rotate, reflect, scale and shear) individual Symbol instances, and even if you edit the stored Symbol, the instances will "remember" and retain their individual transformations.

Creating and Using Symbols

Create a Symbol from an Object on the Artboard
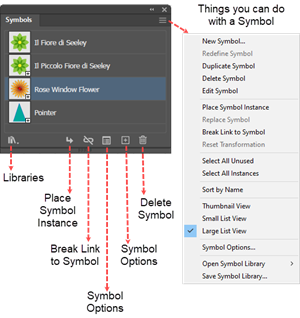
Illustration of things you can do from the Symbols panel
Things you can do from the Symbols panel

To convert an Artboard object into a Symbol in Adobe Illustrator:

  1. Open the Symbols panel.
  2. On the Artboard, select an object that you want to serve as a prototype from which to create a new Symbol.
  3. Drag the prototype object from the Artboard into the Symbols panel. (Alternatively, select the object and in the Symbols panel, click the New Symbol (+) button (F8) at the bottom of the panel). Ai will display the Symbol Options dialog box.
  4. In the Symbol Options dialog box, name the Symbol and as needed, set other Symbol Options. Ai will:
    • Create a Symbol from the object.
    • Replace the selected object with an instance of the Symbol.
Place an Instance of a Symbol

To place an instance of a Symbol on the Artboard in Adobe Illustrator:

  1. Open the Symbols panel.
  2. Drag and drop the Symbol onto the Artboard. Ai will place an instance of the Symbol on the Artboard.

Alternatively, you can select a Symbol in the panel, open the fly-out menu and select the "Place Symbol instance" command. Ai will place the instance in the center of the Artboard.

Symbol Options

Name

This option is the name of the Symbol displayed in the Symbols panel, if you have selected the List View or Small List View option. If, however, you have selected the Thumbnail View option, the name will appear only in a tool tip when you mouse over the thumbnail.

Export Type

This option has two values: Movie Clip and Graphic. They are tags that are used when importing Symbols into Adobe Flash. Within Illustrator the Export Type makes no difference.

Symbol Type Radio Buttons

Dynamic Symbols are ones that allow you to transform instances of the Symbol without having to first break the link between the Symbol and the instance. In the Symbol Options panel, the Dynamic Symbol radio button is checked by default. The information on this page applies only to Dynamic Symbols.

Registration Point

A registration point is the x-y coordinate relative to which Symbol Instances will be transformed (i.e., rotated, reflected, etc.). This option just sets the default Registration Point. You can change it when you use one of the transformation tools. Alternatively, you can edit the Symbol and reposition the Symbol relative to the fixed registration point.

Enable guides for 9-slice scaling

This option allows you to control what parts of a graphic will and will not scale. It is so called because, the guides divide the symbol into 9 regions, that look like a tic-tac-toe grid. If you checked the "Enable guides for 9-slice scaling" option checkbox, when you created the symbol, then when you edit the Symbol you will see the guides. Position the guides so that the center cell of the grid encloses the part of the symbol that you want to scale. The parts of the object that are covered by the other 8 cells will not scale. The classic example of using 9-point scaling is in connection with buttons, where you want only the middle part of the button to scale (and do not want its corners to distort) if you increase the button's width or height.

Modifying the Instances of a Symbol

You can modify an instance of a Symbol without breaking the link to its Symbol.

Transforming Symbol Instances Quantitatively

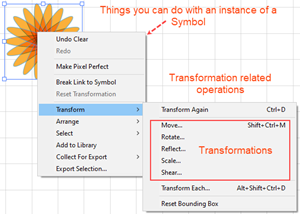
Illustration of How to Launch a Transformation Dialog Box
Launching a Transformation Dialog Box

To transform an instance of a Symbol by entering parameters into dialog box fields in Adobe Illustrator:

  1. Select the Symbol instance that you want to transform.
  2. Right-click the instance. Ai will display a list of things that you can do with an instance of a Symbol.
  3. In the list, click Transform and in the pop-up list, select a transformation. Ai will display the dialog box for the transformation.
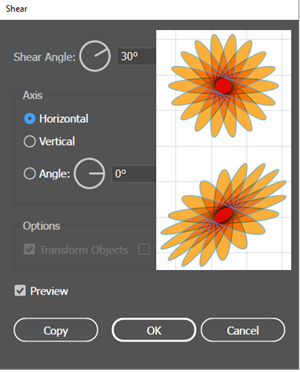
    Illustration of Doing a Shear Transformation via a Dialog Box

    Doing a Shear Transformation via a Dialog Box

  4. In the dialog box fields, enter the parameter values. Ai will transform the instance relative to the default Registration Point that you selected when you defined the symbol.

Transforming Symbol Instances Visually

To transform an instance of a Symbol visually using the Transformation tools in Adobe Illustrator:

  1. Select the Symbol instance that you want to transform.
  2. Click one of the transformation tools.
  3. Optionally, use the tool to select a new Registration Point.
  4. Use the tool's cursor to transform the instance.

Alternatively, you can also transform instances with the Bounding Box controls.

Swap the Symbols Linked to an Instance

To replace an instance of a Symbol (A) with an instance of another Symbol (B) in Adobe Illustrator:

  1. On the Artboard, select the instance of the Symbol (A) that you want to replace.
  2. In the Symbols panel, select the replacement Symbol (B).
  3. Open the panel's flyout menu and select Replace Symbol.  Ai will replace the instance of Symbol A with an instance of Symbol B.

Alternatively, you can simply select the instance (A); then go to the Replace control in the Control panel, click the down arrow, and choose Symbol (B).

Recolor an Instance of a Symbol

You can incrementally recolor an instance of a Symbol provided that it is NOT part of a Symbol Set, i.e., created by the Symbol Sprayer tool.

To use the Symbol Stainer tool to Adobe Illustrator in Adobe Illustrator:

  1. Select the instance of the Symbol.
  2. In the Swatches panel, select a color.
  3. Get the Symbol Stainer Tool, which is in the same group as the Symbol Sprayer.
  4. Optionally, double-click the tool to open its Options dialog box and set its Intensity and Symbol Set Density to a value between 1 and 10, where 10 is the maximum.
  5. Optionally, contract or expand the brush's radius of influence via the left ("[") or right ("]") bracket keys.
  6. Click the Symbol Stainer tool on the instance. Each time you click, Ai will tint the instance more strongly with the color that you selected in the Swatches panel. To undo an application of a tint, Alt + Click on the instance.

Adjust the Opacity of an Instance of a Symbol

You can use the Symbol Screener tool to incrementally adjust the opacity of an instance of a Symbol that is NOT part of a Symbol Set, i.e., created with the Symbol Sprayer tool.

To use the Symbol Screener tool in Adobe Illustrator:

  1. Select the instance of the Symbol.
  2. Get the Symbol Screener tool.
  3. Optionally, double-click the tool to open its Options dialog box and set its Intensity and Symbol Set Density to a value between 1 and 10, where 10 is the maximum.
  4. Optionally, contract or expand the brush's radius of influence via the left ("[") or right ("]") bracket keys.
  5. Adjust the Opacity:
    • To decrease the opacity of the instance, click briefly with the Screener Tool.
    • To increase the opacity of the instance, Alt + click briefly with the Screener Tool.

Modifying a Symbol

You can modify a stored Symbol in two ways:

  • Edit the Symbol, which allows you to change its component's anchor points and control handles.
  • Replace a Symbol with a modified instance of itself.

Editing a Symbol

To edit a Symbol in Adobe Illustrator:

  1. In the Symbols panel select the Symbol that you want to edit, click the hamburger button in the upper left corner.  Ai will drop down a list of Symbol Operations.
  2. In the list select Edit Symbol. Ai will display the Symbol by itself in a new window. Note that switching to Edit mode changes how the Symbol is represented in the Layers panel.  When not in Edit mode, a Symbol has no disclosure triangle in the Layers panel. But when in Editing mode the Symbol will have a disclosure triangle that you can click to see the paths (or Groups) that make up the Symbol.
  3. Make the edits.  You can use the Layers panel and the Appearance panel in the usual way to select or target components of the Symbol.
  4. Exit Symbol Editing Mode: Either double click the Edit window with the Direct Selection tool, or click the left-pointing, "Exit Symbol Editing Mode" arrow, in the upper left corner of the window.

As an alternative to using the Symbol panel, you can double click an instance of the symbol on the Artboard. Ai will pop up a warning message, and if you click OK, Ai will enter a state that looks like Isolation mode in which you can edit the stored Symbol as though you were editing the instance of the symbol.

Redefining a Symbol

To redefine a stored Symbol in Adobe Illustrator by replacing it with a modified instance of itself:

  1. Select an instance of the symbol that you want to redefine.
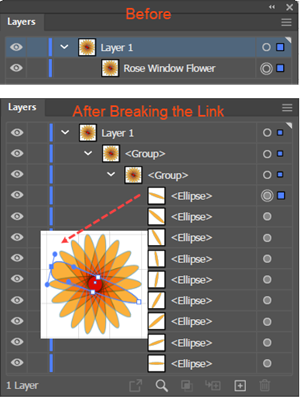
  2. Break the link between the instance and the symbol. Click the Break Link to Symbol button in the bottom of the Symbols panel. Ai will replace the instance with an object of identical appearance.
  3. Edit the object.
  4. Replace the original Symbol with the modified instance (i.e., drag the modified instance into the panel and drop in on the original symbol.

Alternatively, you can use any object (that is not an instance of a Symbol) to redefine a stored Symbol. To use an Artboard object to redefine a Symbol, Alt + Click + Drag the object from the Artboard into the Symbols panel and drop it on top of the thumbnail of the Symbol that you want to redefine.

Creating and Using a Symbols Library

When you create a new document its Symbols panel will have a set of default symbols, which vary with the type of document (e.g., a Web document will have different default symbols than a Print document).

In addition to the default Symbols, Ai saves any new Symbols that you have defined in the Symbols panel. You may also delete Symbols, including the default symbols from the panel. When you save the document, Ai saves the entire contents of the panel including any newly defined symbols, as part of the document, and when you reopen the document, Ai restores the panel as it was when you saved it.

You can also use controls in the Symbols panel to save the contents of the symbols panel as a Symbols Library (as an xxx.ai file), so that you can use it in other documents or share it with others. Ai also ships with many predefined libraries. Of course, you can access both your saved libraries and the predefined libraries from the Symbols panel.

Creating a Symbols Library

To create a Symbols Library in Adobe Illustrator:

  1. Delete all of the default Symbols in the Symbols panel.
  2. Drag the objects that you want to convert to symbols into the empty panel.
  3. Click the hamburger button at the top left of the panel to open the panel menu.
  4. In the menu, choose the Save Symbols as Library option. AI will launch a File Explorer window with the location preset to the folder where Ai stores its User Defined Library files (e.g., C:\Users\your-device-name\AppData\Roaming\Adobe\Adobe Illustrator 25 Settings\en_US\x64\Symbols, or words to that effect).
  5. In the dialog box, name the library file, pick a location:
    • If you want to save the new Library with the other user defined library files, accept the default location.
    • Otherwise, navigate to another location (e.g., one that is shared with other team members).
  6. Click Save. Ai will save the Symbols Panel as a Library (i.e., an xxx.ai document) in your selected location.

Using a Symbols Library

To access a Symbol Library and use a Symbol in Adobe Illustrator:

  1. In the Symbols panel, click the Symbols Libraries Menu button (bottom left). Ai will display a list of Symbol Libraries.
  2. In the list select a Library as follows:
    • If you select a prebuilt Library, simply click the Library name. Ai will open a read-only version of the Libraries panel that contains the Library's symbols. You can dock a prebuilt library with the Symbols panel.
    • If you want to retrieve a Library that you stored with other user defined library files, select the "User Defined", option.  Ai will pop up a sub-menu of the Libraries that you have created.
    • If you want to retrieve a library xxx.ai file from another location (e.g., one that is shared with other team members), select the "Other Library …" item at the bottom of the list.  Ai will open a file explorer window (entitled "Select a library to open," so that you can retrieve the file.
  3. To use a Symbol, drag the Symbol from the Library and drop it onto the Artboard. Ai will place an instance of the Symbol on the Artboard.

Symbol Sets and the Symbol Sprayer Tools

The Symbol Sprayer tool :

  • Creates (sprays out) multiple instances of a Symbol in a single click and drag gesture. The new instances are confined to the radius of a brush. As with all brushes, you can decrease or increase the brush's radius by pressing the open or close bracket keys ([]) respectively.
  • Does not simply place instances of the current symbol directly on the Artboard. Rather, when you start spraying, Ai creates a container object called a Symbol Set, and places all the sprayed instances of the Symbol inside it.  Ai represents the Symbol Set in the Layers panel by a Layer with the default name "Symbol Set," and on the Artboard, shows the Symbol Set by a box surrounding the sprayed instances of the Symbol.
  • You cannot Select, Direct Select, or transform instances of a Symbol that are members of a Symbol set (i.e., created with the Symbol Sprayer tool).
  • To modify the members of a Symbol Set, you must use only the tools that are grouped with the Symbol Sprayer.
  • You can, however, select a Symbol Set and transform it either in the Layers panel or by selecting it on the Artboard.  In either case, the Artboard will display the border of the Symbol Set. Note that:
    • As long as the Symbol Set is selected (i.e., the border is visible), if you spray new Symbols anywhere on the Artboard, Ai will add them to the active Symbol Set.  
    • You can transform a selected Symbol Set (i.e., its boarder and all its contents), by using either the standard transformation tools, or by right-clicking the selected Symbol Set and choosing one of the items on the Transform submenu.
  • Furthermore, you can use the tools that are docked with the Symbol Sprayer to modify Stand-Alone Symbol instances that were not created with the Symbol Sprayer. This is particularly important for:
    • Recoloring stand-alone instances
    • Changing the opacity of stand-alone instances.
  • All the Symbol Sprayer tools modify members of a Symbol Set via a brush:
    • The brush works only when you drag it, not when you simply click with it.
    • The magnitude of the brush's influence is strongest at its center, weakest at its perimeter, and zero outside.
    • You can set the intensity of the brushes effect.
    • Unless you set the brush at maximum intensity, all the modifications that you make with the Symbol Sprayer tool will be incremental, i.e., you can make changes carefully and incrementally in several iterations.

Setting Symbol Sprayer Tool Options

To set the options for one of the tools in the Symbol Sprayer group in Adobe Illustrator:

  1. Double-click on the tool. Ai will open the Symbolism Tools Options panel.

The available options depend upon the tool, but every tool has the following two options, which have important, practical effects on how each tool operates.  

  • Intensity is a value from 1 to 10, where 10 means that the action of the tool will be the most intense. If you set the intensity to a low value you will have more control over the strength of the effect, that is, it will take more applications of the tool to achieve the same effect that you would get from only one application at a higher intensity setting.
  • Symbol Set Density is a value from 1 to 10, where 10 means that the symbols will be packed together at maximum density. You can adjust this value to change the packing density of the symbol instances that you have already sprayed into a Symbol set.

Helen Bradley's video Symbol Sprayer Secrets in Adobe Illustrator – YouTube, not only walks you through the Symbol Sprayer group tools, but also clearly demonstrates the significance of these options.

Distribute Members of a Symbol Set

To incrementally reposition the members of a Symbol Set in Adobe Illustrator:

  1. Select the Symbol Set.
  2. In the Symbols panel, select the symbol whose instances you want to alter.
  3. Get the Symbol Shifter tool.
  4. Optionally, contract or expand the brush's radius of influence via the left ("[") or right ("]") bracket keys.
  5. Optionally, double-click the tool to open its Options dialog box and set its Intensity and Symbol Set Density to a value between 1 and 10, where 10 is the maximum.
  6. Click+ Drag the Symbol Shifter tool in the direction that you want to shift the members that fall inside the brush. Users often employ this tool to spread the members out, away from one another.

Gather or Scatter Members of a Symbol Set

To incrementally pack members of a Symbol Set closer to a point or to move members away from a point in Adobe Illustrator:

  1. Select the Symbol Set.
  2. In the Symbols panel, select the symbol whose instances you want to alter.
  3. Get the Symbol Scruncher tool.
  4. Optionally, double-click the tool to open its Options dialog box and set its Intensity and Symbol Set Density to a value between 1 and 10, where 10 is the maximum.
  5. Optionally, contract or expand the brush's radius of influence via the left ("[") or right ("]") bracket keys.
  6. Position the center of the brush at a location toward which you want to attract members or away from which you want to repel the members:
    • To attract the members toward the center of the brush, Click.
    • To repel the members from the center of the brush, Alt + Click.

Resize Members of a Symbol Set

To incrementally expand or contract one or more members of a Symbol Set in Adobe Illustrator:

  1. Select the Symbol Set.
  2. In the Symbols panel, select the symbol whose instances you want to alter.
  3. Get the Symbol Sizer tool.
  4. Optionally, double-click the tool to open its Options dialog box and set its Intensity and Symbol Set Density to a value between 1 and 10, where 10 is the maximum.
  5. Optionally, contract or expand the brush's radius of influence via the left ("[") or right ("]") bracket keys.
  6. To expand a single member, with the brush sized appropriately, click the Symbol Sizer on the member.  To expand several members, click + drag it across them.
  7. To contract a member, Alt + click the Symbol Sizer on one member, or to contract several members Alt + click + drag it across them.

Recolor Members of a Symbol Set

To incrementally recolor the members of a Symbol Set with a selected color in Adobe Illustrator:

  1. Select the Symbol Set.
  2. In the Symbols panel, select the symbol whose instances you want to alter.
  3. In the Swatches panel, select a color.
  4. Get the Symbol Stainer tool.
  5. Optionally, double-click the tool to open its Options dialog box and set its Intensity and Symbol Set Density to a value between 1 and 10, where 10 is the maximum.
  6. Optionally, contract or expand the brush's radius of influence via the left ("[") or right ("]") bracket keys.
  7. Click or click + drag the Symbol Stainer tool on or across the member or members. With each application of the tool, Ai will more strongly recolor the members within the scope of the brush with the color that you selected in the Swatches panel. To undo an application of an iteration,, Alt + Click on the instance.

Rotate Members of a Symbol Set

To incrementally rotate members of a Symbol Set in Adobe Illustrator:

  1. Select the Symbol Set.
  2. In the Symbols panel, select the symbol whose instances you want to alter.
  3. Get the Symbol Spinner tool.
  4. Optionally, double-click the tool to open its Options dialog box and set its Intensity and Symbol Set Density to a value between 1 and 10, where 10 is the maximum.
  5. Click + drag the Symbol Spinner tool over one or more members of the Set. Ai will show an arrow in each member to indicate the direction of the member's orientation after the drag. If the brush influences only one member, the direction of spin will follow the direction that you drag. The amount that Ai will rotate a particular member depends upon:
    • Its closeness to the center of the brush.
    • The number of times that you drag over it.

Adjust the Opacity Members of a Symbol Set

To incrementally change the Opacity of the members of a Symbol Set in Adobe Illustrator:

  1. Select the Symbol Set.
  2. In the Symbols panel, select the symbol whose instances you want to alter.
  3. Get the Symbol Screener tool.
  4. Optionally, double-click the tool to open its Options dialog box and set its Intensity and Symbol Set Density to a value between 1 and 10, where 10 is the maximum.
  5. Optionally, contract or expand the brush's radius of influence via the left ("[") or right ("]") bracket keys.
  6. To decrease the opacity of the members in the radius of the Screener tool, click + drag or click repeatedly with the Screener Tool.
  7. To increase the opacity of the members in the radius of the Screener tool, Alt + click + drag or click repeatedly with the Screener Tool.

Style Members of a Symbol Set

To incrementally apply a Graphic Style to members of a Symbol in Adobe Illustrator:

  1. Select the Symbol Set.
  2. In the Symbols panel, select the symbol whose instances in the Set you want to alter.
  3. Select a Graphic Style.
  4. Get the Symbol Styler tool.
  5. Optionally, double-click the tool to open its Options dialog box and set its Intensity and Symbol Set Density to a value between 1 and 10, where 10 is the maximum.
  6. Optionally, contract or expand the brush's radius of influence via the left ("[") or right ("]") bracket keys.
  7. Click + drag the Symbol Styler tool across the members. Ai will apply the style to the members within the radius of the brush. For styles that admit of degrees of application, the degree to which Ai will apply the style to a particular member depends upon:
    • Its closeness to the center of the brush.
    • The number of times that you drag over it.

Resources