The Recolor Artwork dialog (Edit > Edit Colors > Recolor Artwork) can, in a single operation, change some or all of the colors used in a selected area of an artwork. The tool works by first inventorying all the colors used in the selection and displaying them in a reassignment grid and on a color wheel. You can then use the grid, the color wheel or both to associate (map) colors in the original selection to new colors. The process can, not only map individual original colors to individual new colors, but can also implement color reductions by mapping several colors onto a single color and can also change colors in bulk via color sliders or by altering color harmony rules.
You can launch the Recolor Artwork dialog by first selecting the artwork that you want to recolor and then executing the command Edit > Edit Color > Recolor Artwork (or by clicking the Recolor Artwork button on the Control panel or on the Properties panel).
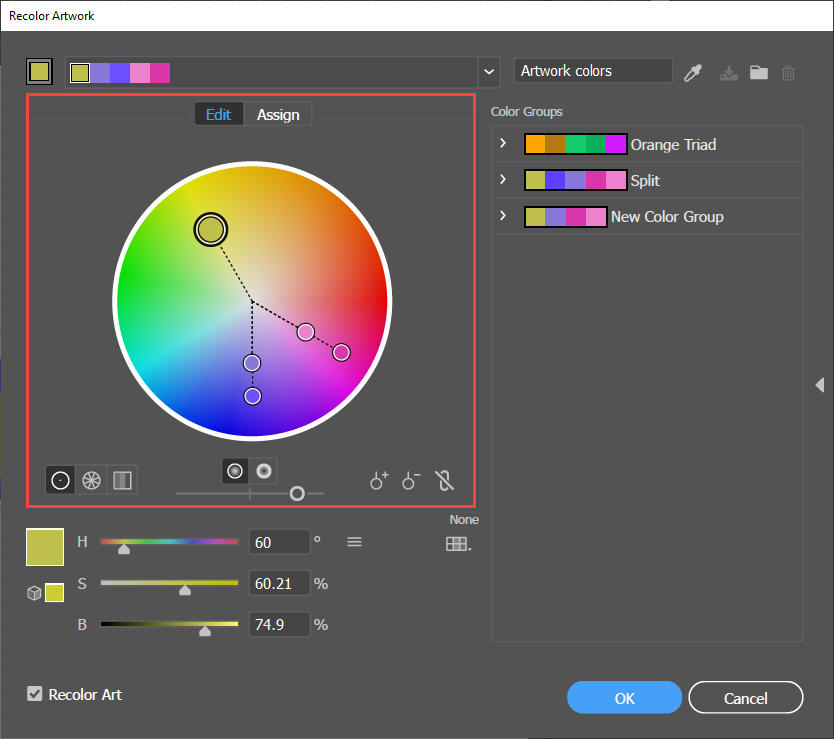
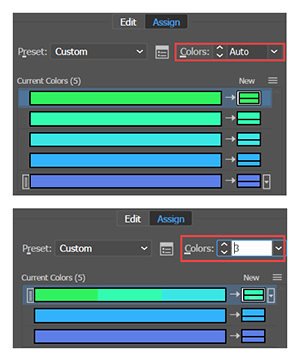
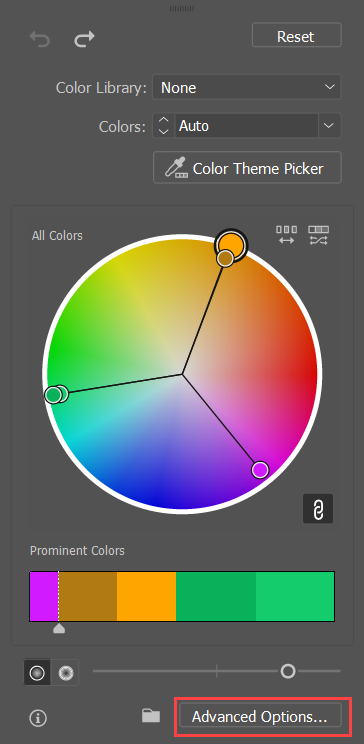
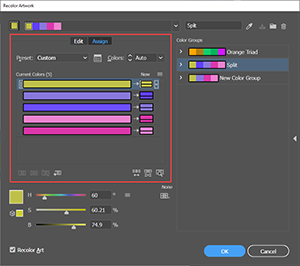
If the Dialog box opens in the compact view (shown in the accompanying figure) click the Advanced Options button to see the expanded view, as shown in the figure below.
Recolor Artwork Dialog Box Organization
Recolor Artwork Dialog Areas
The Recolor Artwork dialog has the following areas:
Remapping Area that provides two alternate
views of the recoloring process.
Assign
Edit
Color Groups Area
General Areas that work with either of the color Remapping areas:
Harmony Rule Area
Color Sliders Area
Recolor Artwork Checkbox
Color Remapping Areas
The dialog provides two synchronized methods for visualizing and manipulating the color mapping. Each method is invoked by corresponding buttons and pressing each button causes Ai to swap in a corresponding area of the dialog box:
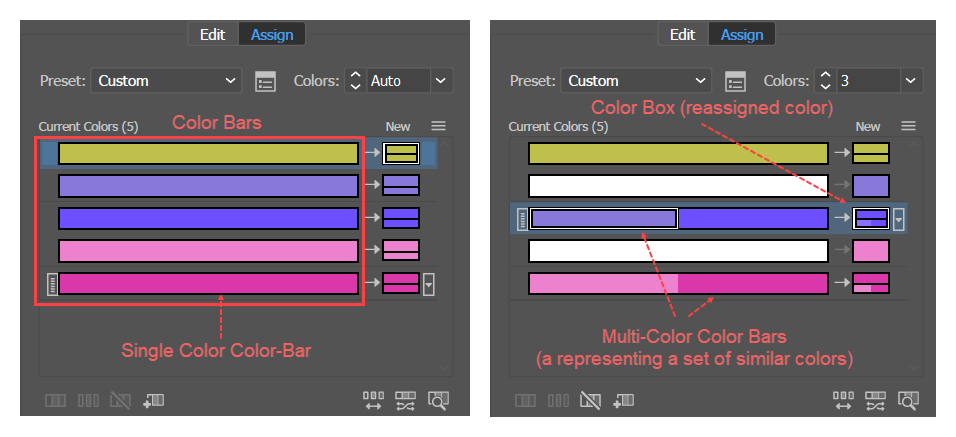
The Assign area manages the mapping primarily via a two-column grid that shows the original "Current Colors" on the left, and the "New" color to which it will be remapped on the right.
The Edit area manages the mapping primarily via a color wheel that represents, not only the colors, but the geometrical relationships of the colors on the color wheel. This panel is essentially the same as the Edit Colors dialog box that you see launch from the Color Guide panel.
Assign Panel
Assign Panel
The Assign area features a color grid, each row of which is made up of a long color-bar, on the left that represents the Current Colors and a short color box on the right that represents the New color to which the Current Color should be mapped, i.e., reassigned. The color box is divided into a top and bottom portion, which as described below, comes into play when you use the panel to reduce the number of colors.
Row of the of the Assign Panel
Each row of the grid signifies a mapping from the color or colors in the bar to the color in the box. The simplest way to recolor artwork is to double click a color box, which will bring up the Color Picker dialog. When you pick a color, Ai updates the mapping grid and displays the New color in the color box.
The colors in the Current Color color-bars do not, as you might infer from the name, change during a single recoloring session. The number of colors in each color bar can change during a single session when you do a color reduction, but the Current Colors change only when you check the Recolor Artwork checkbox and click OK to end the session, Ai then recolors the artwork and changes the colors in the color bars.
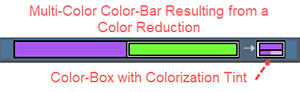
Color reductions combine color bars resulting in a multi-color color bar. For example, the simplest way to reduce the number of colors in the selected artwork is to simply drag one color-bar onto another. Ai will then combine the color-bars and select one of the combined colors to be the New color in the color-box. You can, of course, change the color-box color. Ai will now map the hue of all the colors in the color bar to the hue of the color in the color-box.
However, multi-color color-bars raise another question: If all the color-bar colors get mapped to the same hue, what should Ai do with the differences in brightness or saturation?
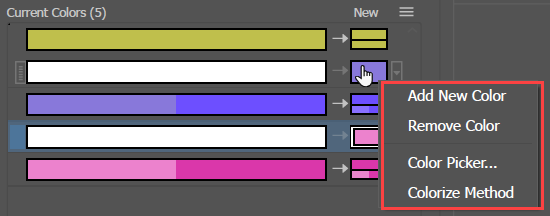
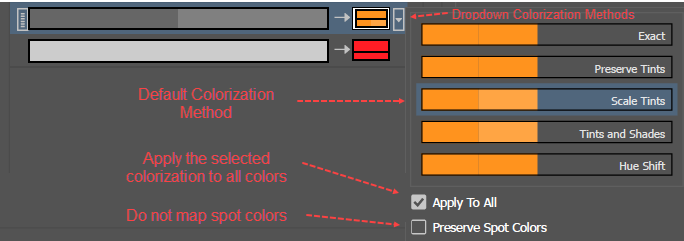
By clicking the down pointing arrow at the right side of the color-box, you can tell Ai how you want it to colorize (i.e., map differences in the brightness or saturation) among the colors in one or all of the multi-color color bars that result from a color reduction.
The available colorization methods are:
Colorization Methods
Exact: Do not colorize, i.e., give all the bar colors the same brightness as the box color.
Scale Tints (default): Map the darkest bar color to the brightness of the box color. Map the other bar colors to a proportionally lighter tint.
Preserve Tints: For global colors or spot colors, map the current tint of the bar color, to a corresponding tint of the box color. For regular colors, do the same thing as for Scale Tints.
Tints and Shades: Take the average brightness of the bar colors and let that correspond to the brightness of the box color. For each bar color determine its difference from the average. Let the brightness of the bar color correspond to the average, and map each bar color to a tint or shade of the box color in proportion to how much it varies from the average.
Hue Shift: Determine a typical color or the color that contains the most information and make it the Key Color, i.e., the color to which all other colors are compared. Then determine how much each bar color differs from the key color in hue, saturation, and brightness. Then map the box color to a color the differs from the bar color by the same amount as it differed from the key color in hue, saturation, and brightness.
The bottom half of the color box indicates visually which colorize rule is in effect, or at least that some colorize rule is in effect.
In each row of the grid, the two columns are separated by an arrow widget, which not only indicates the, left-to-right direction of the mapping (from the bar to the box), but also functions as a toggle control that can enable or disable the mapping process for that row. Clicking the arrow turns it into a simple line and signifies that the row is protected, i.e., it will not take part in the specified recoloring process, even in a bulk recoloring process, that is implemented by changing the color harmony rule.
Color Reduction Controls
At the top row of the Assign panel, above the remapping grid, are controls for color reductions.
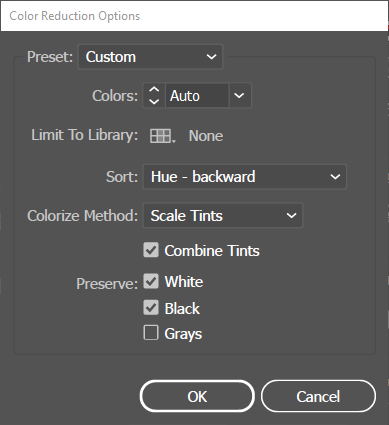
Color Reduction Options Dialog
There are two shortcut controls and between them is an icon ( ) that launches a Color Reduction Options dialog box. You can use the dialog box to tell Ai to:
Select a color reduction preset. This field is the same as the control to the left of the icon.
Specify a maximum number of colors to which Ai should reduce the recolored artwork by combining color bars. This field is the same as the control to the right of the Color Reduction Options icon.
Specify that Ai should limit the colors that can participate in the remapping to those in some library.
Sort the color box colors by hue or lightness.
Select a colorization method (equivalent to the methods displayed in the dropdown by clicking the down arrow at the right of the color box).
Combine tints, i.e., reduce the number of remapping rows by placing all tints of the same hue in the same row. Illustrator's documentation recommends that you use this setting with the Preserve Tints colorization method, but only when the artwork contains tints of global or spot colors.
Preserve (i.e., do not remap) white, black, or gray. If one of these checkboxes is checked and the artwork contains the color, the color row will contain, not an arrow, but a line.
Assign Panel Controls
At the bottom of the Assign panel, below the remapping grid is a row of buttons that, in order from left to right, tell Ai to:
Merge two bars into a single bar. This button is active when you have selected two rows for merging.
Separate two or more selected color-bar colors into seperate color-bars. You can select individual colors in a color bar, and this button is active when you have done so.
Exclude (i.e., protect) a selected bar from the remapping process.
Add a new row to the remapping grid.
Randomly change the order of colors in the mapping.
Randomly change the saturation and brightness of colors in the mapping.
Show you where a selected row's color-bar color is used in the artword.
Edit Panel
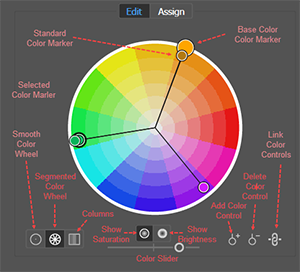
Edit Panel Color Wheel
The Edit panel focuses the user’s attention on the color groups and the harmony rules that the embody. It allows you to create a new color group, edit any of the color groups represented in the Color Groups area of the dialog, or edit the colors in the current selection. The advantage of using the Edit Area is that you can make remapping edits in full awareness of the artwork’s color relationships as they are represented in the color wheel. For example, you can remap the hue of an individual color by rotating its color marker on the color wheel or remap its saturation or brightness by dragging it radially on the wheel. You can also remap all the colors in bulk by linking and them rotating them in unison around the wheel. The hues of all the colors will change but the harmony relationships among the colors will remain intact.
Edit Panel with Segmented Color Wheel and the Wheel Radius Controlling Saturation and the Color Slider Controlling the Saturation
At the bottom of the Assign panel, below the remapping grid is a row of buttons that, in order from left to right, tell Ai to:
Display a smooth color wheel in which each pixel is a different color.
Display a segmented color wheel (that groups colors together into segments in order to make it easier to select a color).
Display the color-box colors in columns.
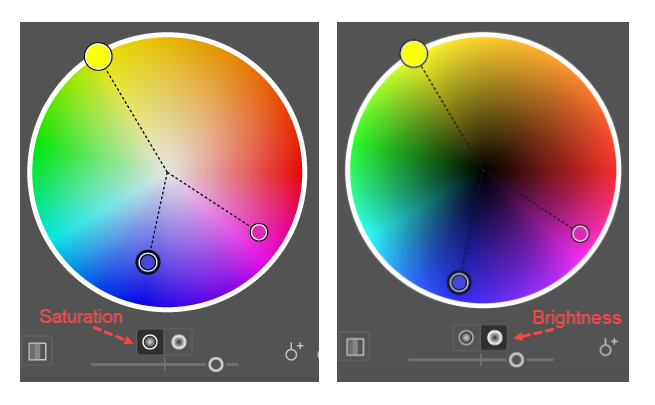
Make the color wheel show the saturation as the position of a color control along the radius (the default) and show the hue as the angle of a color control's position on the wheel.
Make the color wheel show the brightness as the position of a color control along the radius and show the hue as the angle of a color control's position on the wheel.
Select the tool to add a color marker by clicking on the color wheel.
Select the tool to delete a color marker by clicking on it.
Link the color markers on the color wheel so that they all remain in the same relative position when any one of them is moved.
Change whatever color attribute (brightness or saturation) is not represented on the color wheel by moving the Color Slider at the extreme bottom of the Edit panel.
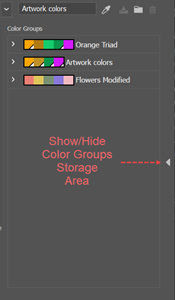
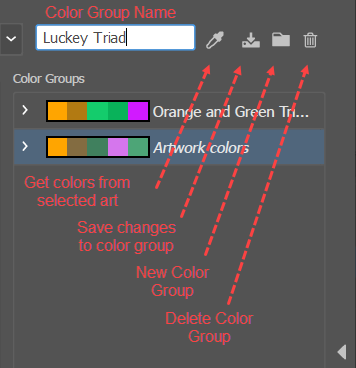
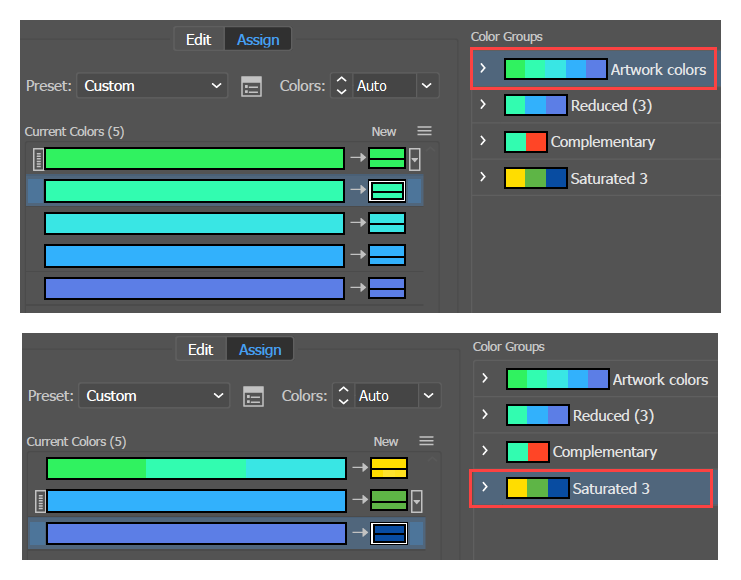
Color Groups Area
The Color Groups area provides a view of the Swatches panel that shows only the color groups. You can show or hide this area by clicking the Color Group Storage triangle on the right.
In the Recolor Artwork dialog box color groups function primarily as containers for particular instances of color harmonies. That is, a color group specifies a general geometrical relationship among the colors on the color wheel. Color groups that are instances of the same rule may vary in the hue, saturation or brightness of the base color, and saturation or in the brightness values of their non-base colors.
Three Color Groups that are Different Instances of the Same Color Harmony Rule
With the controls in this area, you can, at any time, name and save the New (remapped) colors as a Color Group, which will them be stored in the Swatches panel and listed in the Color Group area.
When you first select artwork and launch the Recolor Artwork dialog, the Current Colors and the New (remapped) colors listed in the Assign panel are the same. Therefore, you can start work by clicking the New Color Group (folder icon) button to save the original colors in a color group. This practice will allow you to revert to the art work's original coloration even after you recolor the artwork and save the color groups several times.
Color Group Area Controls
You can also use color groups to recolor selected artwork. Simply double click on any color group to recolor the selected artwork with the color group's colors. If the new color group has fewer colors than the original color group, Ai will do a color reduction. If the new color group has more colors than the original, Ai will select some of the new colors and map them to the original colors, but will not add colors from a color group to the artwork..
In practice three situations are important:
If the selected artwork does not match any selected color group and you click the New Color Group button, Ai makes a new color group with the default name "Artwork Colors".
If you recolor the selected artwork with a color group (so that the color group is selected), then edit the recoloring, and then click the New Color Group button, Ai will create a new color group with the default name Color Group.
If you recolor the selected artwork with a color group (so that the color group is selected), then edit the recoloring, and then click the Save button (with tool tip "Save changes to color group"), Ai will update the selected color group, overwriting its old colors.
General Areas
In addition to the Color Groups area and the Color Remapping areas, the dialog provides several general areas that remain active independently of whether or not the Color Groups panel is displayed, or which Color Remapping area is visible.
Harmony Rule Area
Harmony Rules Area
This area (at the top of the dialog box) provides the following unlabeled controls:
Analogous Colors Harmony Rule Centered on an Orange Base Color
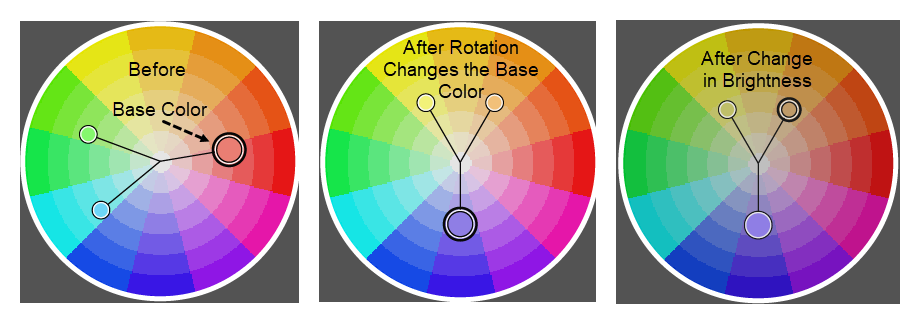
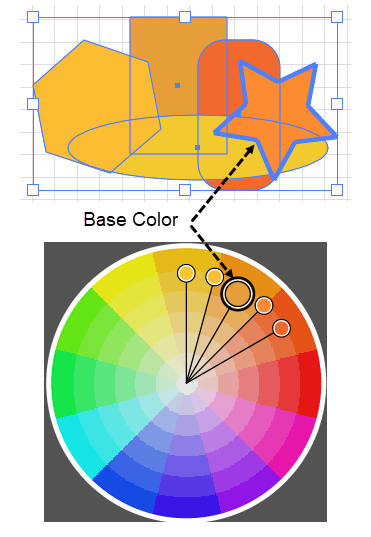
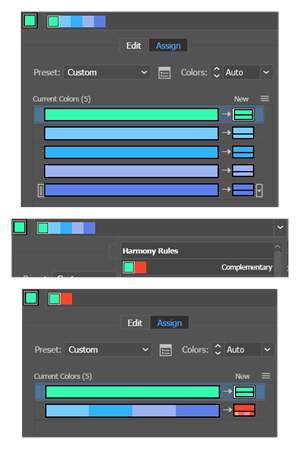
Base Color – displays the base color Clicking this control after targeting a color in the Active Color row makes the targeted color the base color. Clicking the Base Color control without targeting a new active color, switches between the current and previous base color. Its tool-tip says, "Set current color as the base color." In the Recolor Artwork dialog, setting a color as the base color does three things:
It influences how Ai will construct a color group when you select a new Harmony Rule. Some color harmony rules (e.g. the Complementary or the Analogous rules), when applied to a color group, will arrange the colors relative to a particular, base color.
On the Edit panel's color wheel, Ai shows the base color with an oversized color marker.
When you have linked the color markers in the color wheel (by clicking the Link button, ), moving the base color moves the other markers relative to the base color:
Moving the base color marker in toward, or out from the center moves all the markers in the same way.
When working with a color group that is an instance of a Split Complementary or Analogous color rule, then if the color markers are linked dragging one of the non-base color markers around the color wheel will move all the non-base markers proportionately relative to the base color marker, but will leave the base color marker unmoved.
Active Color – displays a row of swatch-like controls each of which represents one of the color box (New) colors in the Assign panel. Clicking on one of the controls targets the color so that you can click the Base Color control to make the targeted color the color group's Base color.
Color Harmony Rule dropdown – changes the color harmony rule that governs the Active colors using the base color. This will change the rule represented in the Edit panel color wheel and will change the Assign panel's box colors, combining the bar colors, as necessary.
Color Sliders
How Color Sliders relate to the Selected Color Box or Color Marker
The controls in this area change the color of any selected color-box in the Assign panel or any selected color marker on the color wheel in the Edit panel. To select a color-box or color marker single-click it (do not double-click on either a color-box or a color marker; that would launch the color picker). When you click on a color-box, Ai surrounds it with a white border. When you single-click on a color marker, Ai surrounds it with a black border. When you select a color-box or a color-marker, Ai enables the Color Sliders. Changing a color slider will reassign the selected color.
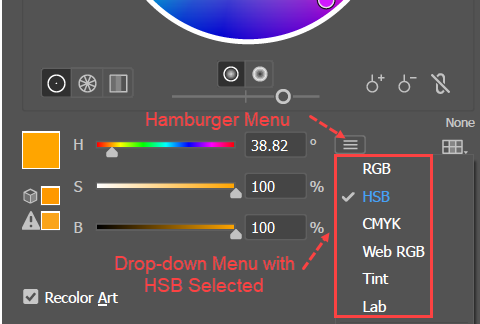
The hamburger button menu allows you to select the slider's color model. The HSB color model has a special status because the conventional, preset color harmony rules are expressed most succinctly on the color wheel in the HSB model. When a model other than HSB is selected, adjusting a slider causes the selected color marker to move in a curved path (along two dimensions) on the color wheel. Whereas, with the HSB model selected, adjusting a slider causes the selected color marker to move uniformly in a single dimension: linearly along the brightness dimension or the saturation dimension, or radially around the Hue dimension of the color wheel.
The hamburger button menu also contains options for Lab colors and for Global Adjust.
The Lab colors option allows you to edit colors in the Lab color space. Lab is short for CIE L*a*b, CIE is the Commission internationale de l'éclairage (International Commission on Illumination). The L*a*b is important for several reasons:
Its color metrics apply to any platform.
The numerical increments in its metrics correspond to analogous increments in the human color perception response.
Luminance is specified on its own (L) dimension separately from color (which is measured on the a and b dimensions. That is important because human form perception depends almost exclusively on luminance. Changing colors in other color models change luminance and color at the same time, so that achieving the desired recoloring can easily destroy the perceptual integrity of an image's form.
Making global changes to Saturation, Brightness, Temperature, and Luminance
The Global Adjust option allows you to change all the color-box colors (or color-marker colors) simultaneously. With the Global Adjust option selected, the color sliders enable percentage adjustments (from -100% to +100%) in each of 4 characteristics:
Saturation
Brightness
Temperature
Luminance
Recolor Artwork checkbox
This checkbox controls the display of the current state of the remapping on the artboard. When the checkbox is unchecked, Ai will not show how the current remapping will affect the artwork on the artboard. So, by checking and unchecking this checkbox, you can quickly see the before and after effect of a remapping, not just on the individual colors, but in the context of the art. However, note that if the Recolor Artwork checkbox is unchecked, when you click OK, Ai will not save the update to the selected artwork
Common Tasks
This section describes the tasks for which the Recolor Artwork dialog (Edit > Edit Colors > Recolor Artwork) is commonly used.
Preliminaries
Assuming that you have a reasonable number of colors in the selected artwork, before you begin to recolor, you may wish to:
Save the original colors of the artwork as a color group.
Remove unused swatches and color groups from the document's Swatches panel.
Save Original Colors
When you first select artwork and launch the Recolor Artwork dialog, the Current Colors (color-bars and the New (remapped, color-box) colors on the Assign panel are the same. Therefore, you can use the New Color Group (folder) button, which always saves the color-box colors, to back up the artwork's original colors to a color group. This will allow you to revert to the art work's original coloration even after you gone through several iterations of recoloring.
To save the artwork's original colors in Adobe Illustrator:
Select the artwork.
Launch the Recolor Artwork dialog (Edit > Edit Colors > Recolor Artwork or Click the Recolor button on the Command panel or in the Properties panel. When launched for the first time, Ai will set the Name field in the Color Group area to "Artwork colors."
In the top row of the dialog's Color Group area, click the New Color Group (folder) button. Ai will create a new color group with the default name "Artwork colors."
Optionally, change the text in the Name field.
Hint
Within a single recoloring session, you can click the eye-dropper button to revert to the color-bar colors that were in effect at the beginning of the session. However, after you have once changed the colors and saved them, the eyedropper button can no longer retrieve the initial colors from the first session.
Clean up the Color Groups area and the Swatches panel
The Color Groups area in the Recolor Artwork dialog automatically lists all the color groups in the Swatches panel (and the Swatches panel automatically lists all the color groups that you create in the Color Group area). Therefore, the Color Groups area can be cluttered with the default color groups in the Swatches panel. You can save space and reduce clutter by removing the default color groups.
To clean up the Color Groups area and make the Swatches panel reflect the current state of recoloring in Adobe Illustrator:
Go to the Swatches panel and click the hamburger button. Ai will show the panel's dropdown menu.
On the menu, choose the "Select All Unused" option. Ai will select all the swatches that are not used in the document.
Click the Trash Can icon at the bottom of the Swatches panel. Ai will remove all unused colors and color groups from the Swatches panel and unused color groups will no longer show up in the Recolor Artwork panel's Color Groups area.
Color Reduction Methods
Color Bars and Color Reduction
When, with art selected, you first open the Recolor Artwork dialog (Edit > Edit Colors > Recolor Artwork), the Assign panel grid shows a color-bar containing one color for each color in the selected artwork. Reducing the number of colors is a matter of intelligently combining these single-color color-bars into a smaller number of multi-color color-bars, which are essentially, sets of similar colors. You can then refine the color reassignment by assigning new colors to each of the remaining multi-color color bars and setting a suitable colorization method.
If it is feasible to manually combine each of the colors and then remap the remaining colors, the success of the recoloring will depend on the extent to which you:
Combine colors that are either similar in hue, or are not widely used in the selected art.
Recolor the remaining colors using a colorization method that preserves the luminosity differences with each hue, which are essential to human perception of form and location.
Unfortunately, in some cases notably tracings where an image has been converted into vector art, it may not be feasible to do color reduction manually. In that case, Mordy Golding, in his post Recoloring Complex Artwork in Illustrator suggests that you:
Use one of the Recolor Artwork dialog's automatic color reduction/recoloring techniques to get a first approximation color reduction.
Refine the first approximation manually, considering where and how extensively the remaining colors are used in the artwork.
The articles in this section describe how to do color reduction manually and how to use several (first cut) automated techniques.
Reduce Colors Manually
To reduce colors manually by combining color bars in the Assign panel color grid in Adobe Illustrator:
Select the Art and open the open the Edit > Edit Colors > Recolor Artwork dialog.
Go to the color grid in the Assign panel and locate two color-bars whose colors you want to combine.
Optionally, to see where and how extensively a particular color is used, select its color-bar, and then click the magnifying glass icon at the bottom of the grid. Ai will gray-out all the areas where the target color is not used.
A minor color that is sparsely used is a good candidate for being combined with a major color that is widely used, especially if a colorization rule can preserve the visual distinction between the minor and major color by making the minor color a tint of the major color.
Click on one of the two color-bars and drag it on top of the other color-bar. Ai will combine both color-bars into a single multicolor color-bar, which will allow you to assign both colors to a new color.
Keep the Recolor Artwork checkbox checked to see live updates. Repeat the above steps until you have reduced the number of color bars to an acceptable degree.
Go to the bottom of the Recolor Artwork dialog, ensure that the Recolor Artwork checkbox is checked and click OK. Ai will recolor the artwork.
Delete Rows from the Assign Panel Color Grid
Hint
When you combine two color bars, you leave behind a useless row on the color reassignment grid. To delete a row, right-click a on the row's color box. Ai will drop down a menu on which you can delete the row by choosing "Remove Color."
Reduce Colors Automatically
The Recolor Artwork panel (Edit > Edit Colors > Recolor Artwork) provides several methods that can automatically reduce the number of colors based on a combination of user entered constraints and intelligent color grouping.
Reduce Colors to a Specific Number
You can both reduce and reassign colors automatically to a specific number of colors. To protect a color from being automatically reassigned, in a row of the Assign panel's color grid, click on the arrow between the to-be-protected color's color-bar and its color-box.
To reduce the colors in the selected artwork to a specific number in Adobe Illustrator:
Automatic Color Reduction to a Specific Number of Colors
Go to the row of Color Reduction buttons at the top of the Assign panel.
Click the down pointing arrow at the right of the Colors Field and select a number of colors or simply type in a number of colors. In the color grid, Ai will automatically combine the color-bars into the selected number of rows and reassign to each color bar a New color, displayed in the color-box at the right of the arrow.
Optionally, save the color reassignment to a new color group.
Ensure that the Recolor Art checkbox at the bottom of the dialog is checked.
At the top of the dialog, change the default name, and click the New Color button (with the file folder icon) Artwork checkbox is checked. Ai will save a new color group with the reduced number of colors.
Go to the bottom of the Recolor Artwork dialog, ensure that the Recolor Artwork checkbox is checked, and click OK. Ai will recolor the artwork.
Reduce Colors Using a Color Harmony Rule
Color Harmony Rule Area
You can both reduce and reassign colors automatically to just those colors used in a specified color harmony rule and base color. To protect a color from being automatically reassigned, in a row of the Assign panel's color grid, click on the arrow between the to-be-protected color's color-bar and its color-box.
To reduce the number of colors in the selected artwork using a Color Harmony Rule in Adobe Illustrator:
Color Reduction via the Complementary Color Rule, which Uses only two Colors
Set the base color:
Go to the Active Colors display (the second group of color swatches at the top of the Recolor Artwork dialog and select a color that should serve as the base color for the Harmony rule.
Go back to the first color swatch and click it (the first swatch has the tool tip "Set current color as the base color." Ai will set the selected color as the base color, but will change the color in the first swatch.
Go to the Color Harmony field in the top row of the Recolor Artwork dialog and click the down pointing arrow. Ai will drop down a list of color harmony rules.
Select a color harmony rule.
Optionally, save the color reassignment to a color group.
Ensure that the Recolor Artwork checkbox at the bottom of the dialog is checked.
At the top of the dialog in the Color Group area, change the default name, and then click the New Color button (with the file folder icon). Ai will save a new color group with the reduced number of colors.
Go to the bottom of the Recolor Artwork dialog, ensure that the Recolor Artwork checkbox is checked, and click OK. Ai will recolor the artwork.
Reduce the Colors Using a Color Group
You can both reduce and reassign colors automatically using a color group, either one in the Color Group area list or one from a library, that has fewer colors than the selected artwork. To protect a color from being automatically reassigned, in a row of the Assign panel's color grid, click on the arrow between the to-be-protected color's color-bar and its color-box.
To reduce the number of colors in the selected artwork using a Color Harmony Rule in Adobe Illustrator:
Color Reduction by Assigning a Color Group with Fewer Colors
Go to the Color Groups Area and select a color group from the list. Ai will recolor the artwork with the colors of the color group, reducing the number of colors in the group.
Alternatively: select a Library Color Group:
Go to the row of Color Reduction buttons at the top of the Assign panel and click the Color Reduction Options button. Ai will open the Color Reduction Options dialog.
Click the Limit to Library button. Ai will drop down a list of libraries.
Select a thematic library, i.e., not a Color Books library, but one that contains color groups. Ai will combine the color-bars in the Assign panel's color grid to just the number used in the selected library and then reassign each remaining color to a similar color in the library.
Optionally, save the color reassignment to a color group.
Ensure that the Recolor Art checkbox at the bottom of the dialog is checked.
At the top of the dialog, change the default name, and click the New Color button (with the file folder icon) Artwork checkbox is checked. Ai will save a new color group with the reduced number of colors.
Go to the bottom of the Recolor Artwork dialog, ensure that the Recolor Artwork checkbox is checked, and click OK. Ai will recolor the artwork.
Reassign Colors
Reassign a Color Using the Color Picker
To reassign one of the color-bar colors in the Assign panel to another color using the Color Picker in Adobe Illustrator:
Go to the Assign panel color grid.
Optionally, to see where a particular color is used, select its color-bar, and then click the magnifying glass icon at the bottom of the grid. Ai will gray-out all the areas where the target color is not used.
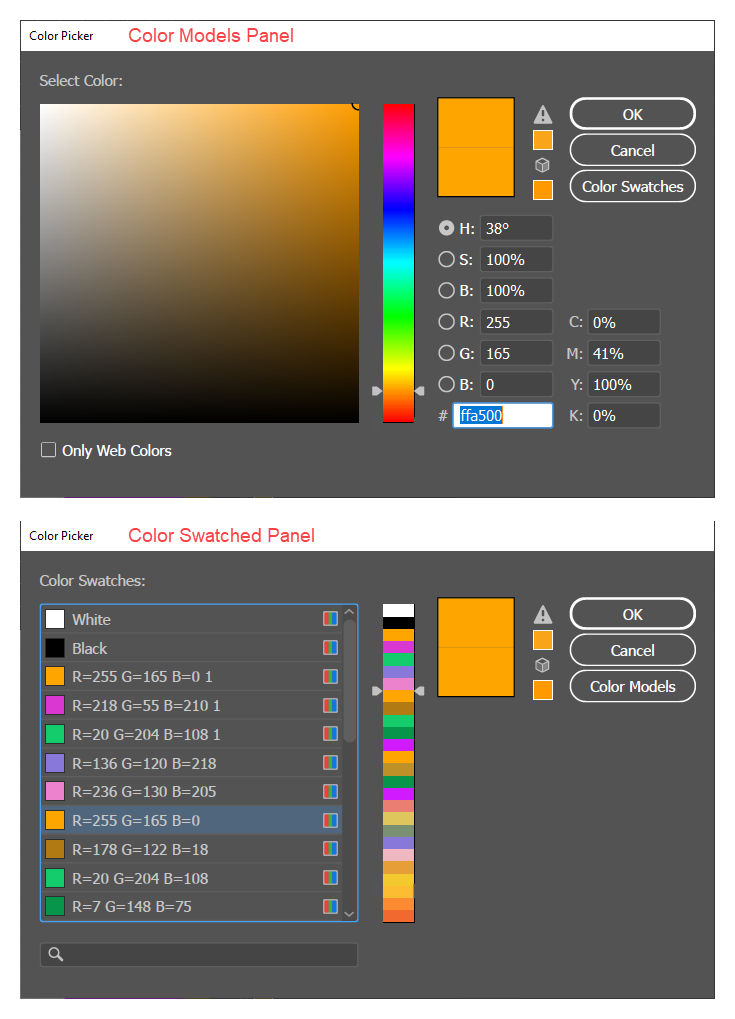
Row of the of the Assign PanelDouble click the color-box to target the color that you want to reassign. Ai will display the Color Picker.
In the Color Picker, select a color or click on the Color Swatches button and select a swatch. Ai will change the color in the Color-bar and will change all the instances of the original, Color-bar color to the new color in the Color Box.
Color Picker Panel
Note that a color reassignment will not change the artwork colors unless you have: (A) checked the Recolor Artwork checkbox and then (B) click the OK button at the bottom of the Recolor Artwork dialog box.
Reassign a Color Using the Color Slider Area
To reassign one of the color-bar colors in the Assign panel to another color using the Color Slider Area of the Recolor Artwork dialog in Adobe Illustrator:
Go to the Assign panel color grid and single-click on a color-box to select the color-box of the color that you want to reassign. Alternatively, go to the Edit panel and select the color-marker that you want to reassign.
Optionally, to see where the selected color is used, click the magnifying glass icon at the bottom of the grid. Ai will gray-out all the areas where the target color is not used.
Change the selected color by sliding the color sliders. Ai will assign the color shown on the sliders.
Reassign the Base Color using the Hue Slider
Note that a color reassignment will not change the artwork colors unless you have: (A) checked the Recolor Artwork checkbox and then (B) clicked the OK button at the bottom of the Recolor Artwork dialog box.
Reassign Colors Globally using Color Sliders
Global Adjust Color Slider Option
To globally adjust the Saturation, Brightness, Temperature, or Luminosity of all the colors in a color mapping in Adobe Illustrator:
In the Color Sliders area, click the hamburger menu button. Ai will twirl down a color model options menu.
On the menu, select the Global Adjust option.
Move the sliders. If you have checked the Recolor Artwork checkbox, you can see the results as you move the sliders.
Click OK.
Note that a color reassignment will not change the artwork colors unless you have: (A) checked the Recolor Artwork checkbox and then (B) click the OK button at the bottom of the Recolor Artwork dialog box.
Reassigning Colors and Colorization after a Color Reduction
A color reduction yields several rows of the Assign panel grid in which colors of different hues have been combined into a single, multi-color color bar. Assigning a new color to a color-bar (by changing the color of the color box after the arrow), will assign a color of a new hue, but that does not mean that all the colors in a multi-color color bar will be mapped to a color of the same saturation and brightness as the color-box color. Ai may map the colors in a multi-color color-bar to colors of the same hue but of different tints or shades, depending on the colorization method.
Selecting a Colorization Method
To reassign colors after a color reduction in Adobe Illustrator:
Go to the Assign panel, and if necessary, update the remapped colors for each row by changing the color in the color-box.
Go to a multi-color row and click the down arrow at the right of the color-box. Ai will drop down a list of colorization methods.
Select a colorization method for that row or click the Apply to All checkbox to apply the same colorization method to all rows. When you have selected a colorization method for each row, go on to the next step.
Recommended: Save the colorization as a color-group (click the New Color Group icon that looks like a file folder.
Recommended: Go to the Swatches panel, find the new color-group, and convert all of its colors to global colors or spot colors. That will enable you to change all the instances of the colors (wherever they appear in the artwork) via the Swatches panel.
The available colorization methods are:
Exact: Do not colorize, i.e., give all the bar colors the same brightness as the box color.
Scale Tints (default): Map the darkest bar color to the brightness of the box color. Map the other bar colors to a proportionally lighter tint.
Preserve Tints: For global colors or spot colors, map the current tint of the bar color, to a corresponding tint of the box color. For regular colors, do the same thing as for Scale Tints.
Tints and Shades: Take the average brightness of the bar colors and let that correspond to the brightness of the box color. For each bar color determine its difference from the average. Let the brightness of the bar color correspond to the average, and map each bar color to a tint or shade of the box color in proportion to how much it varies from the average.
Hue Shift: Determine a typical color or the color that contains the most information and make it the Key Color, i.e., the color to which all other colors are compared. Then determine how much each bar color differs from the Key Color in hue, saturation, and brightness. Then map the box color to a color the differs from the bar color by the same amount as it differed from the key color in hue, saturation, and brightness.
Color Wheel Controls
Reassign a Color using the Color Wheel
The Edit Area allows you to make reassignments in full awareness of how the artwork's color relationships look on the color wheel. You can also change several colors in a single operation while preserving the harmony relationships that obtain among the colors.
The Color Wheel represents each of the Artwork's colors by the position of a color marker on the color wheel. Each color marker on the Color Wheel corresponds to a color-box (reassigned) color on the color grid in the Assign panel. Changing a color marker on the Color wheel updates the color-box color on the Assign panel grid and vice versa.
Color Slider Dropdown Menu
To reassign a color using the Color Wheel in Adobe Illustrator:
Select a color model from the menu that drops down when you click the hamburger button in the Color Sliders area. For the sake of concreteness, this explanation will assume that you have selected the HSB model, which is intuitive and has the advantage that changes to its color sliders correspond to simple movements of the markers on the color wheel.
Select the color marker that you want to modify.
To change the colors:
Setting whether the Radius of the Color Wheel represents the Saturation or the Brightness
Either drag the marker around the color wheel, or change the Hue color-slider to change the marker's hue.
If necessary, make the color wheel display the color's saturation value by its position along the wheel's radius, by clicking the leftmost of the two controls directly under the color wheel. Then either drag the marker along the radius or move the Saturation color slider.
If necessary, make the color wheel display the color's brightness value by its position along the wheel's radius, by clicking the rightmost of the two controls directly under the color wheel. Then either drag the marker along the radius or move the Saturation color slider.
After dragging a color marker, Ai will reassign the color marker's previous color to its modified color. However, note that a color reassignment will not change the artwork colors unless you have: (A) checked the Recolor Artwork checkbox and then (B) click the OK button at the bottom of the Recolor Artwork dialog box.
Reassign Color Relationships via the Color Wheel
Color Wheel with Color Marker Positions Linked to Preserve Relationships
To systematically change the color wheel relationships among colors in Adobe Illustrator:
Link the color relationships: On the Edit panel, in the row of icons below the color wheel, click the link icon at the far right.
Select a color model from the menu that drops down when you click the hamburger button in the Color Sliders area. For the sake of concreteness, this explanation will assume that you have selected the HSB model, which is intuitive and has the advantage that in HSB mode changes of the color sliders correspond to simple movements in the color wheel.
Make one of the following 3 systematic changes in the color relationships:
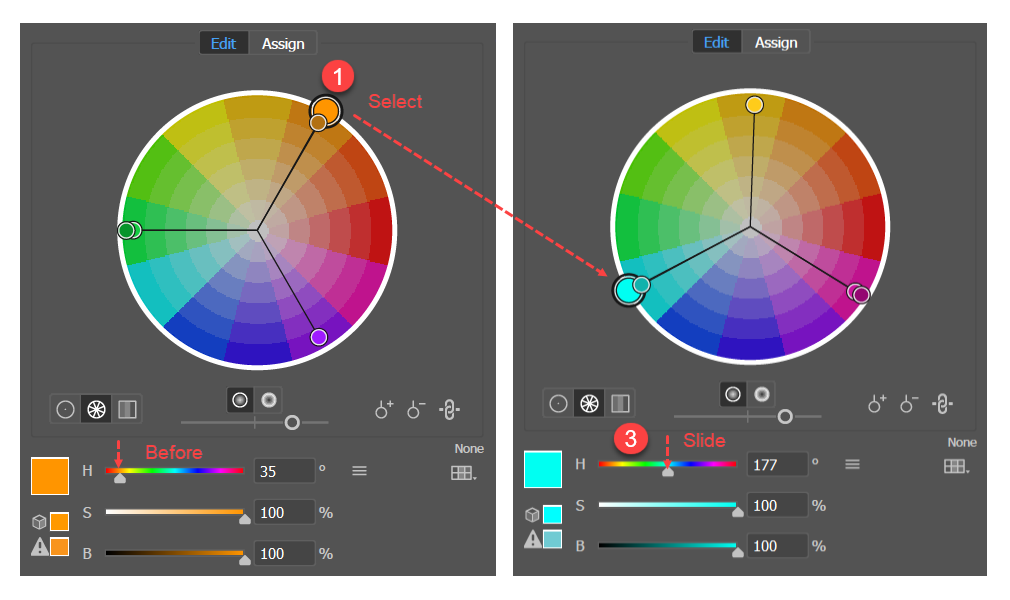
Rotate the color wheel. Ai will reassign all the colors, but will keep the relationships intact.
Move the base color marker in toward, or out from the center. Ai will move all the markers in the same way.
When working with a color group with a Split Complementary or Analogous color rule, drag one of the non-base color markers around the color wheel. Ai will move all the non-base markers proportionately relative to the base color marker, but will leave the base color marker unmoved.
Note that a color reassignment will not change the artwork colors unless you have: (A) checked the Recolor Artwork checkbox and (B) clicked the OK button at the bottom of the Recolor Artwork dialog box.
Save a Color Reassignment as a Color Group
Update a Color Group
To have opened the Recolor Artwork dialog, you must have selected some artwork. To save your color reassignment changes to a particular color group, you must have previously applied that color group to the artwork, or have saved previous artwork changes to that color group. However, when you select artwork and open the Recolor Artwork dialog, Ai does not automatically select the color group that corresponds to the selected artwork.
Update Button
To save color reassignment changes to an existing color group in Adobe Illustrator:
Select the color group that was used to create the selected artwork.
Make local or global changes to the artwork that uses the colors in the selected color group. As soon as you make the change, the dialog will unhide the "save changes to Color group" button at the top of the Color Group area.
Click the Update button. Ai will update the color group with the reassigned colors.
Save Color Changes into a New Color Group
Save Button
To save a color reassignment to a new color group in Adobe Illustrator:
Make the color reassignments. Ai will accumulate the (New) color-box colors into a hidden color group with a default name, such as "Artwork colors" in the easily overlooked, unlabeled name field.
Click the New Color Group button, which looks like a file folder. Ai will add a new color group with the default name "Artwork colors" to the Color Groups area.
Give the new color group with the default name "Artwork colors" a respectable name, make sure that you have clicked the Recolor Art checkbox, and click the OK button


 ) that launches a Color Reduction Options dialog box. You can use the dialog box to tell Ai to: