You can use the Eyedropper tool to transfer appearance attributes from one object (the source) to another (the destination).
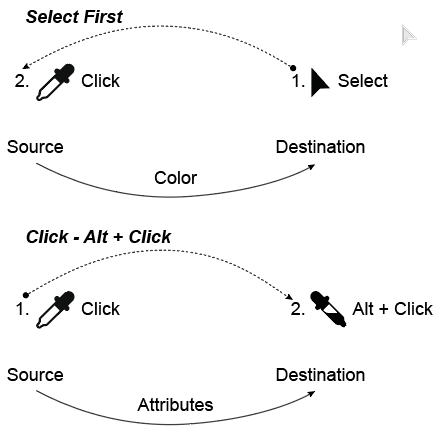
Eyedropper Tool Methods. Dotted lines indicate the order of the steps in the transfer. Solid lines indicate the flow of information.
Illustrator provides two methods for using the tool, the:
Select-First Method, in which you first select the destination object, get the tool, and then click on the source object. This method is most often used to sample colors from a raster image in order to create a color palette for some artwork.
Click –-Alt + Click Method, in which you start with nothing selected, get the tool, click on the source object to pick up its attributes, and then Alt + Click on the destination object to apply the attributes to it. This method is most often used to transfer all the attributes from one vector object to another.
The Eyedropper tool is a bit more complicated than it looks, and the complication comes about partly because when sampling a color from a raster image, it is necessary to specify, not only the destination object, but also the destination attribute, i.e., the Fill or Stroke of the destination object that you want to overwrite with the sampled color. There are also 5 variables that can influence how the tool works, including the:
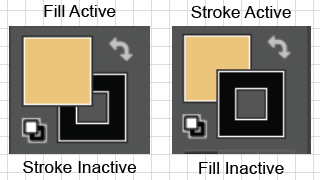
Active vs Inactive States of the Tool panel's Fill-Stroke Widget.Fill-Stroke Widget settings in the Tool panel. As soon as you click with the Eyedropper tool to sample a color, the Fill-Stroke Widget in the Tool panel will show you the Fill and Stroke color values that Ai will transfer to the destination object. When you sample a color from a source image, Ai automatically sets the Widget so that: (a) its Fill icon is active (in the foreground), (b) it displays the sampled color, and (c) the Stroke icon is inactive, and its value is set to "none." However, if you use the Click – Alt + Click method with the Shift option (i.e., Shift + Click – Alt + Click), you must set the Widget manually. That is, before you click on the image, you must click the Fill icon or the Stroke icon in the Widget to make it the active (targeted) attribute. As shown in the figure, the active attribute is the one whose icon in the Widget is in the foreground. Then when you sample the color, Ai will set the active attribute's color to the value that you sampled, and when you Alt + Click, Ai will apply the color in the active icon to the corresponding attribute in the destination object. The sampling process will not change the color of the inactive attribute, but Ai will, nonetheless, apply the inactive attribute's color to the corresponding attribute of the destination object.
Source object, especially whether it is an image or a vector object. As noted in the previous bullet, when you click with the Eyedropper tool to sample a color from a raster image, Ai will automatically set the destination attribute's Fill to the sampled color and set the Stroke to "none."
Destination object, which must be a vector object, or a Swatch in the Swatches panel. That is, after you sample a color, you can click the "New Swatch" button in the Swatches panel to make the sampled color (shown in the Widget's Fill icon) into a swatch.
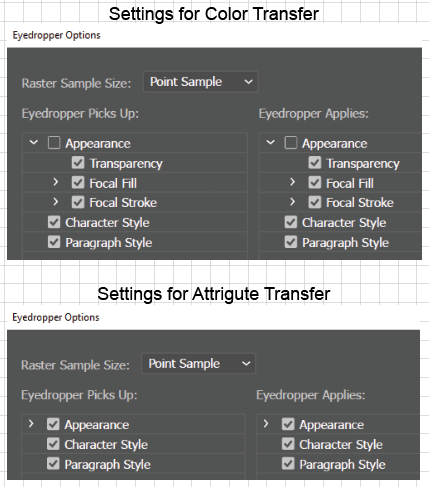
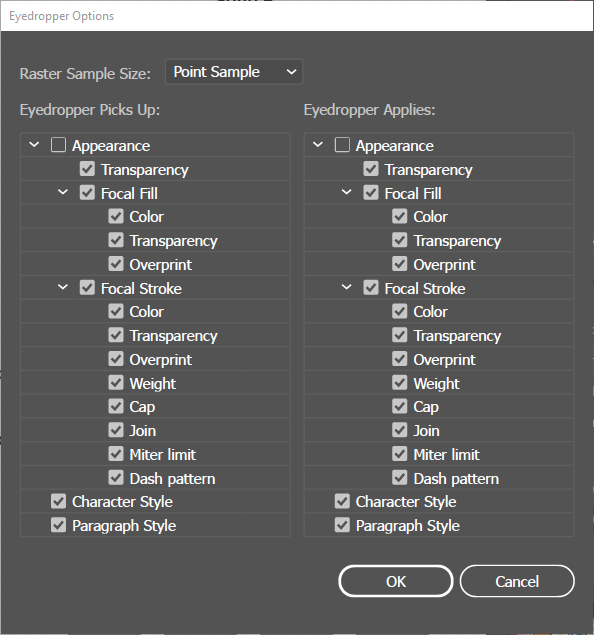
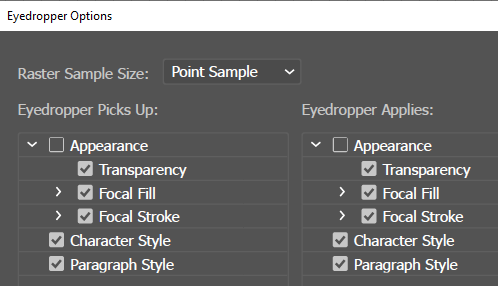
Expanded vs Unexpanded setting of the Eyedropper Options dialog.Eyedropper Options settings, which allows you to choose which attributes of the source object the Eyedropper will pick up and which options it will apply to the destination object. In addition, when you are transferring a color from a raster image, you must (as shown in the accompanying figure), have the Appearance checkboxes unchecked and expanded. When you are transferring all the attributes from a vector object that has a complex appearance (i.e., multiple Fills, multiple Strokes, or Effects) to another vector object, you must have the Appearance checkboxes check and not expanded.
Use of the Shift + Click Alternative, which you can use instead of simply clicking with the Eyedropper tool and is most often used as an alternative to the first Click in the Click – Alt + Click method. The option tells Ai that you do not want it to pick up all of a vector source object's attributes, but to sample just the color under the cursor, and that you want to place it in the attribute that is active in the Tool panel's Fill-Stroke Widget.
Actually, if the destination object has a complex appearance (i.e., has more than one Fill, more than one Stroke, or has an Effect), the value in the Tool panel Widget, Fill and Stroke icons, will be transferred only to the destination object's top Fill and top Stroke. That is, the Fill and the Stroke that are uppermost in the stacking order shown in the appearance panel.
Using the Eyedropper Tool
Setting the Eyedropper Tool Options
Eyedropper Options Dialog
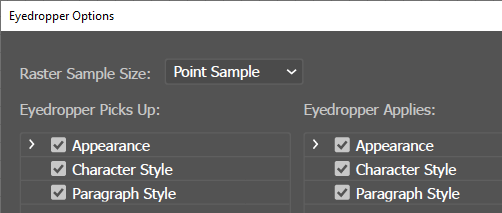
To set the Eyedropper tool Options, double-click on the tool. Ai will display the Eyedropper Options dialog. By default, the Eyedropper both picks up and applies all Appearance attributes as well as all Character Styles, and all Paragraph Styles.
When the two Appearance checkbox groups are expanded, the main Appearance Group checkboxes themselves are not checked, but all the checkboxes inside the Appearance group are checked. Therefore, you might think that whether or not the Appearance group of checkboxes is expanded would make no difference. However, in my tests I have found that:
For transferring colors with the Select First method, having both the Picks Up and Applies Appearance group checkboxes unchecked but expanded works well but having them unchecked and unexpanded does not work at all.
For transferring appearances with the Click – Alt + Click method, having both the Picks Up and Applies Appearance group checkboxes unchecked and unexpanded works best because it works better on objects with a complex appearance.
Sampling Colors from an Image
Transfer a Color from an Image to a Vector Object with the Select First Method
Options Setup for Sampling a Color from an Image
To sample a color from an image and apply it to a vector object (e.g. a rectangular color chip) via the Select First method: in Adobe Illustrator:
Set the Eyedropper Options for sampling colors: Double-click the Eyedropper tool to open its Options dialog and explicitly uncheck both the Picks Up and Applies Appearance checkbox groups so that they are expanded.
Transfer a color from the image to the vector object:
Get the Select tool (v-key) and click the destination (vector) object.
Get the Eye Dropper tool (i-key). Ai will switch to the Eyedropper cursor.
Click a location in the source (image) to sample a color. Ai will
Set the Fill color to the sampled color and make it active (i.e. the current or targeted attribute, the icon that is in the foreground).
Set the Stroke color to "none" and make it inactive
Hint
If the image has so much detail that even nearby color samples will vary greatly from point to point, and therefore not represent a viewer's impression of the image's color at that location, you can do two things to make the sample more characteristic of the image:
When setting the Tool's options in Step 1, you can set the Raster Sample Size to a value that is larger than Point Sample (3 x 3 pixels or 5 x 5 pixels).
Decrease the image's color variability in the image before you use the Eyedropper tool. For example, you could do the following just after you place the image on the Artboard:
Apply the Effect > Pixelate > Crystalize to the image and set the cell size to a value that exposes patches that display the representative colors in the image.
Execute the Object > Expand Appearance command so that Ai converts the Effect into equivalent looking paths, which you can sample as described above.
Transfer a Color from an Image to a Vector Object with the Click - Alt + Click Method
To sample a color from an image and apply it to a vector object (e.g. a rectangular color chip) using the Click – Alt + Click method in Adobe Illustrator:
Set the Eyedropper Options for sampling colors: Double-click the Eyedropper tool to open its Options dialog and explicitly uncheck both the Picks Up and Applies Appearance checkbox groups so that they are expanded.
Transfer a color from the image to the vector object:
In the Tool panel's Fill-Stroke widget, click the icon for the attribute (Fill or Stroke) into which you want Ai to paste the sampled color in the destination object.
Get the Eyedropper tool and press the right mouse button. Ai will switch to a cursor that has a square modifier icon and looks like a partially full eyedropper. As you move the cursor over the Artboard, the active attribute in the Tool panel's Fill-Stroke widget will preview the color that the Eyedropper is sampling.
When you see that the tool is sampling the color that you want, Shift + Click in the source image to sample the color.
Alt + Click the destination vector object. Ai will copy the sampled color to the attribute of the destination object that you activated in Step 2. In the destination object, the attribute that you made inactive will remain unchanged.
Transfer Color Samples from an Image to the Swatches Panel
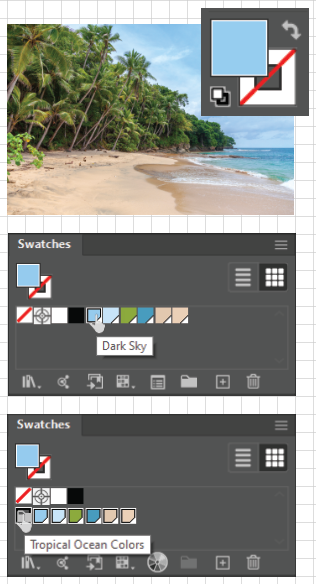
A common task is to use colors from a raster image to create a Color Group that you can use as the color palette for an artwork. Ai allows you to use the Eyedropper tool to sample colors from an image that you have Placed on the artboard, use each sample to create a Global Swatch, and then aggregate the Swatches into a Color Group.
To transfer colors from an image to the Swatches panel in Adobe Illustrator:
Important Eyedropper Options Settings
Double-click on the Eyedropper tool to open the Eyedropper Options dialog and in the dialog:
Uncheck both the Appearance Eyedropper Picks checkbox and the Eyedropper Applies checkbox, so that their subsidiary checkboxes are expanded and checked.
In the Raster Sample Size dropdown, choose a size that is larger than Point Sample.
Steps in creating a Color Group by transferring colors from an image: Sample colors using the Preview (top), create Swatches (middle), and make the Swatches into a Color Group (bottom).
Get the Eyedropper Tool (i-key).
Click and drag over the image with the Eyedropper.
As soon as you click on the image, Ai will set the Stroke icon in the Tool panel's Fill-Stroke widget to none and make the Stroke inactive.
As you drag, Ai will preview the color in the Fill-Stroke widget.
In the Swatches panel, click on the New Swatch icon. Ai will launch the New Swatch Dialog.
In the dialog, give the new Swatch a name and check the Global checkbox to make the Swatch a Global Color. That will enable you to update the color at any time and Ai will automatically update the places where the color was used.
Repeat the previous 3 steps until you are done sampling colors from the image.
Select all the new color swatches and click the Net Group icon to make them into a Color Group. Ai will combine the swatches into a Color Group.
Transfer Appearance Attributes among Vector Objects
Options Setup for Transferring Attributes among Vector Objects
To copy attributes from one vector using the Click – Alt + Click method in Adobe Illustrator:
Double-click the Eyedropper tool to open its Options dialog and explicitly check both of the Picks Up and Applies Appearance group checkboxes so that the groups are not expanded.
Deselect everything on the Artboard.
Get the Eyedropper tool (i-key). Ai will display a cursor that looks like an empty eyedropper.
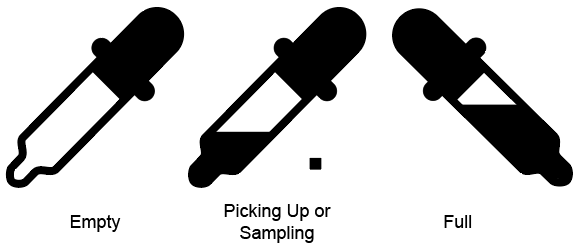
The 3 cursor's states comprise a metaphor. Initially (left), the Eyedropper's tube is empty. As you Click and Drag (or Shift + Click and Drag) over the Source objects, Ai sucks up the attributes under the cursor into the tube (middle). Releasing the right mouse button stops the process. When you Alt + Click on the destination object, the full Eyedropper (right) squirts the attributes onto the destination object.
Right-click on the Artboard. Ai will:
Switch to a cursor that looks like a partially full eyedropper and has a square modifier icon. The tool is now picking up the attributes.
As you drag over various objects, Ai will change the Fill and Stroke display in the Tools panel. But it is sampling all attributes, even multiple Fills and Strokes.
Copy the Attributes: Hover over the source object from which you want to copy the attributes and release the mouse button. Ai will display a cursor that looks like a full eyedropper, and will copy the attributes to the clipboard.
Paste the Attributes: Alt + Click on the destination object to which you want to transfer the attributes. Ai will transfer the attributes from the source object to the destination object, overriding all the destination object's previous attribute settings.